- Virtualization stack growing pains and PeerTube Hype!
- Jonathan Haack
- Haack’s Networking
- webmaster@haacksnetworking.org
//peertube//
Latest Updates: https://wiki.haacksnetworking.org/doku.php?id=computing:peertube
As part of the Haack’s Networking business, I run a virtualization stack on a Supermicro 6028U-TRTP+ Dual 8-core Xeon E5-2650 2.2Ghz, with 384GB RAM, which has 576 virtual CPUs to allocate, or 24*12*2, which is threads *cores*sockets. This host uses Debian and virsh+qemu and a collection of bash scripts to manage a virtualization stack. If you are interested in the setup, check this post. It resides behind a vpn with ssh restricted to source IPs from the vpn zone. The business activities conducted by this server include infrastructure for the business (this tech blog, invoicing, the wiki, etc.), direct services for clients (hosting, backups, etc.), outreach programs for communities I support (mastodon, matrix, etc.), and hosting for Pokemon projects (pvpoke fork/skin, etc.), in order of importance. About two weeks ago, this server suddenly became unreachable. I co-locate this server at Brown Rice Internet, Taos NM. I strongly recommend these folks for anyone in the region.

The server went down around 4:12am, or at least this is when a cronjob sent a failure and after which, no further scheduled jobs or email reports came in. The job it was working on was a live and full backup of the matrix instance, which is a roughly 350Gb qcow2 image. The bash script it was running involves sparsification with virt-sparsify and a collection of qemu-img and virsh snapshot commands that basically keep all writes in an overlay while the qcow2 disk is being copied, and then merge it back with the main image once the backup/copying is complete. There’s no validation in the script nor any failsafe to ensure it works correctly or fails safely. So, its entirely possible that something went wrong during this script execution and that virsh overfilled the memory buffer or got stuck in some type of loop that crashed the system. It’s also entirely possible that it was a physical layer problem and that a cable got loose or something arced and caused a disruption to the link. Because both myself and the Brown Rice staff admitted defeat early on, and succumbed to hard powering off the machine, it shall remain a mystery. A mystery which caused me to learn a lesson again: never power off unless you absolutely must. It’s important to know why the machine crashed. But, lacking my own IPMI/kvm (by choice, he he) and being bound to using theirs, both sides have social capital involved in an extra interaction. The solution here is setting up my own IPMI/kvm on the next on site upgrade next quarter or the one after. The other eye opener was how reliant my business and I, personally, have become on this instance. In a brief 24-48 period of baby rage immediately following the outage, I attempted to migrate all infrastructure outlined above to Digital Ocean. I succeeded in migrating about 10 IPs and spaces, all working just fine. Updated DNS and Dynadot’s fast caching was on point. However, on the primary MTA for haacksnetworking.org and the associated virtual hosts (invoicing, wiki software, repo, etc.), ssh suddenly became non-responsive. Naturally, I pulled up the Digital Ocean web panel and attempted to access ssh via their TLS console. That also was not responsive … but, everything was working. I now had the same problem as I had at the Data Center, but everything was up. My only choice, however, for any future work or ssh access was to hard power down the instance. And yes, upon doing this, ssh started responding again just fine. But … I had violated the very same rule and had once again powered off a machine. Yes, it was a virtualized machine but a machine nonetheless – data corruption won’t discriminate.

It was at this moment that I realized I was not on a justified migration but on a baby rage bender. The so-called big kid cloud infrastructure failed in a similar way. Now although the SuperMicro failure was complete (all services and VMs and physical host were all unreachable), it was still a similar issue. It was a proverbial wash. Downtime, as I tell my clients, is part of life. It’s not about removing it, it’s about minimizing its impact. So, now that my baby rage was over, it was time to answer the question … how do I minimize downtime and optimize rebuilding time. Okay, so I have the hot spare, but how hot is it? When was the last time I turned those fans on in the business office and pulled the latest VMs? My conclusion was it was fairly cold and that I needed something smaller, like a 1u that could run more often and not disrupt the acoustic bliss I’ve achieved in my office. So, I ordered a SuperMicro 1029U-E1CRTP2 w/ some Xeon Silvers (causes price to be lower) but yet had 256GB RAM in 32GB modules, making the $300 price tag a total steal. This machine is half as noisy, newer than the older SuperMicro spare I was using prior, and is designed for SSDs, so less power and smaller size. Perhaps I can get some 500W to power this!? Okay, that takes care of what to put in place of the machine if it fails and after I travel up there to replace it. But what happens in the mean time while it failed? Where does everything run while I take a few days, a week, or what have you to replace/swap everything? I have two other jobs in addition to this “side business” so it’s not like I can just stop everything and conduct a massive migration. One solution is to put one of these SuperMicros at another data center. But that means another hardware upkeep, another physical location to be responsible for maintaining when failure happens, etc. It seems off to backup the self-hosted co-located data center rig with another self-hosted co-located data center rig. Sure, if you have funds and budget for the increased cost of management, it makes sense, but I don’t. A better solution was dedicated hosting – not baby VPS or huge blocks of aws storage – just dedicated hosting. Custom rigs and/or virtualized infrastructure pooled together to offer an experience just like self-hosting. I’m now fresh off the baby rage and scouring hosting services for three days straight, comparing proxmox hosting (managed and unmanaged), larger VPS + load balancer Digital Ocean options, other remote options. Eventually, I stumble on PebbleHost, which allowed me to spin up the following machine and allocate 13 IPs to it:
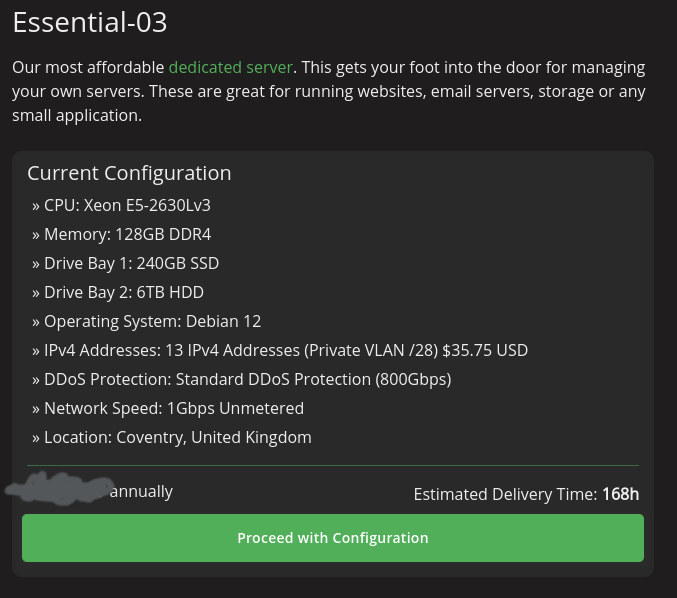
This machine is about half as beefy as the machine at the data center. It has one socket, 8 cores, and 16 threads, or about 128 virtual CPUs to allocate. But/and, for spinning up 10 mission critical backup instances while I am busy swapping the primary hardware at the data center, this will certainly do the trick. Now, naturally, I did not spend this entire time baby raging or binge purchasing improvements, I was also concluding a semester for math and computer science students and, oh yeah, on a whim decided that … in light of the physical host crashing, what could be better than spinning up not one but two new instances! Yes, I spent idle time during this 1-2 week period spinning up a PeerTube instance for my business and another for the Public GNU/Linux Users Group I moderate. Now, it wasn’t completely lost on me that maybe the vicinity of a total hardware crash was not necessarily the wisest time to spin up federated media sharing, but hey … it’s gonna work until it doesn’t. But on a real note, the last thing I did (circa days 3-5 after physical host crash), was that I went through each virtual machine one-by-one, and evaluated cores/ram allocation. I reduced cores by over 50, reduced RAM by over 32GB, and I found 7 or so VMs that did not have fstrim properly setup and/or had other errors. The exercise saved me precious resources which I used to justify setting up the PeerTube instances while I coped.

Setting up the PeerTube instances was pretty straightforward. The official documentation and the Linode documentation together were all I needed to get everything up. Although tempted to setup the reverse proxy virtual hosts using apache, I figured no need to get spicy on the first spin ups. To begin with, install node and some development dependencies and then use npm to install yarn. Here’s what I did:
sudo apt-get update -y && sudo apt-get upgrade -y
sudo apt-get install build-essential gnupg curl unzip
sudo curl -fsSL https://deb.nodesource.com/setup_18.x | sudo -E bash -
sudo apt-get install nodejs -ysudo npm install -g yarn
After that, install all remaining dependencies. I like doing things in this order just to ensure node and yarn are happy before I move on. This comes from trauma dealing with node and yarn over in Mastodon territory. Here’s the other pre-requisites:
sudo apt-get install sudo ufw python3-dev python3-pip python-is-python3 certbot nginx ffmpeg postgresql postgresql-contrib openssl g++ make redis-server git cron wget letsencrypt python3-certbot-nginx postfix mailutils
Of course, this would be a good time at this stage to make sure that A records and PTR records are set up for the IP address being allocated to this project. I did that. While those were caching, I set up the non-root and postgres management user and established the web root as its home directory:
sudo systemctl start redis postgresqlsudo systemctl enable --now nginx postgresql redis-serversudo useradd -m -d /var/www/peertube -s /bin/bash -p peertube peertubesudo passwd peertubels -ld /var/www/peertube [standard out should be drwxr-xr-x]
After setting up the user and home directory, I created the database and associated rights/privileges, and downloaded the latest peertube repository:
sudo -u postgres createuser -P peertubesudo -u postgres createdb -O peertube -E UTF8 -T template0 peertube_prodsudo -u postgres psql -c "CREATE EXTENSION pg_trgm;" peertube_prodsudo -u postgres psql -c "CREATE EXTENSION unaccent;" peertube_prodVERSION=$(curl -s https://api.github.com/repos/chocobozzz/peertube/releases/latest | grep tag_name | cut -d '"' -f 4) && echo "Latest Peertube version is $VERSION"
After that was done, it was now time to create some directories and files for peer tube to be customized to your particular server and then download and build the latest version:
cd /var/www/peertubeVERSION=$(curl -s https://api.github.com/repos/chocobozzz/peertube/releases/latest | grep tag_name | cut -d '"' -f 4) && echo "Latest PeerTube version is $VERSION"sudo -u peertube mkdir config storage versionssudo -u peertube chmod 750 config/cd versionssudo -u peertube wget -q "https://github.com/Chocobozzz/PeerTube/releases/download/${VERSION}/peertube-${VERSION}.zip"sudo -u peertube unzip -q peertube-${VERSION}.zip && sudo -u peertube rm peertube-${VERSION}.zipcd /var/www/peertubesudo -u peertube ln -s versions/peertube-${VERSION} ./peertube-latestcd ./peertube-latestsudo -H -u peertube yarn install --production --pure-lockfilesudo -u peertube cp peertube-latest/config/default.yaml config/default.yamlsudo -u peertube cp peertube-latest/config/production.yaml.example config/production.yamlopenssl rand -hex 32<21122312redacted32b82323132redacted23277b212321>sudo -u peertube nano config/production.yaml
Adjust the webserver, secrets, database, and admin sections to chosen values. I will note that I have smtp setup on this host but I cannot yet get the config working with it. I will update the wiki (link at top) when this fix goes live. Now the nice thing is that they not only provide your nginx reverse proxies, but they give you some sexy sed commands to tweak them to your needs. This is a far cry from setting up rocket chat or r-studio where you are in nomad’s land setting up the RPs. Here we go, just replace domain.com with your value:
sudo cp /var/www/peertube/peertube-latest/support/nginx/peertube /etc/nginx/sites-available/peertubesudo sed -i 's/${WEBSERVER_HOST}/domain.com/g' /etc/nginx/sites-available/peertubesudo sed -i 's/${PEERTUBE_HOST}/127.0.0.1:9000/g' /etc/nginx/sites-available/peertubesudo ln -s /etc/nginx/sites-available/peertube /etc/nginx/sites-enabled/peertubesudo systemctl stop nginxsudo certbot certonly --standalone --post-hook "systemctl restart nginx"sudo systemctl reload nginx
Make sure that some needed tcp and kernel stuff is right:
sudo cp /var/www/peertube/peertube-latest/support/sysctl.d/30-peertube-tcp.conf /etc/sysctl.d/sudo sysctl -p /etc/sysctl.d/30-peertube-tcp.conf<net.core.default_qdisc = fq_codel><net.ipv4.tcp_congestion_control = bbr>
Build your systemd units:
sudo cp /var/www/peertube/peertube-latest/support/systemd/peertube.service /etc/systemd/system/sudo systemctl daemon-reloadsudo systemctl enable peertubesudo systemctl start peertubesudo systemctl status peertube
Once that’s done, you are just about ready, you only need to reset your root password for logging in to the web panel:
cd /var/www/peertube/peertube-latestsudo -u peertube NODE_CONFIG_DIR=/var/www/peertube/config NODE_ENV=production npm run reset-password -- -u root
After this, the rest is configuration on the website itself. Obviously, I made sure to harden the server, add the VM to the backup rotation, snapshot rotation, and configured the firewall and required cron jobs (certs, trim). But of course the customized logo preferences don’t work so after some forum hunting, I just overwrote the logos manually:
cd /var/www/peertube/peertube-latest/client/dist/assets/images/favicon.png and logo.svg
In my case, I allocated the VM running this instance 8GB of RAM and 8 cores. In searching the official forums, I found the the project founder recommending that – for the fastest transcoding – that you turn on threads to 8, and leave concurrency at 1. For now, this seems to be reasonably quick, and the initial transcoding takes about 85% of the time it took to make the original video. Since creating these instances, I have setup channels, playlists, tested live streaming with OBS Studio and allowed legacy and/or members in good standing in the pubglug to join in on testing the functionality. All is working well … here are the instances I setup:
Haack’s PeerTube: https://content.haacksnetworking.org/c/haacknet/videos?s=1
GNU/Linux Tube: https://gnulinux.tube/c/pubglug/videos
So far so good, but so what?! Now, when the physical host crashes and/or any VMs fail, I have two ways to restore the instances: 1) A hot spare and 2) dedicated remote hosting. Alright, will something fail so we can test this?! Noooo … I jest … please everything just work. I don’t need more stress!
Happy Hacking
– oemb1905