- bind9dns
- Jonathan Haack
- Haack’s Networking
- webmaster@haacksnetworking.org
//bind9dns//
Latest Updates: https://wiki.haacksnetworking.org/doku.php?id=computing:bind9dns
Introduction
This tutorial is for users of Debian GNU/Linux to set up an authoritative DNS server using bind9. An authoritative DNS server serves DNS records about other hosts … that is, you use an authoritative server to serve domain.com’s A, AAAA, DMARC, SPF, etc., records. These records can then be queried by a recursive DNS resolver. Bind9 can also do recursion, however, it’s far more commonly used as an authoritative DNS server. Unbound, on the other hand, is designed primarily for recursive DNS. If you are just looking to protect against leaks and guard DNS privacy, you should instead head over unbound-dns instead. In this tutorial, we will:
- Create Root Zone and configure base server cluster (master + 2 slaves) w/ CLI
- Create apache2 reverse proxy (apache2 is public; serves requests upstream to localhost:10000)
- Create webmin server cluster, configure each node’s firewall and fail2ban
- Adjust webmin’s global bind9 settings to work with underlying base server settings
- Add zone using CLI
- Add zone using webmin
- Setup DNSSEC using CLI
- Setup DNSSEC using webmin
- Configuring your Registrar’s GLUE records, i.e., registering and pointing nameservers
This tutorial presumes you already have three working and sufficiently hardened VMs/VPSs with LAMP stacks and access to PTR for each of the three different external IPs they leverage, six if you include IPv6. If you don’t know what some or all of that is, take a step back and start with Apache Survival before proceeding. If you feel comfortable so far, and you have three different VMs/VPSs setup and ready, well then carry on.
Part 1 – Host Setup
Make sure that you set your full hostname with hostnamectl set-hostname nsX.haacksnetworking.com and/or equivalent for your use-case on each node. Of course, install bind9 with apt install bind9 bind9-utils bind9-dnsutils -y. After that, ensure that each host has local DNS resolution via /etc/hosts/ that informs each node about itself, its alias, and those of every other node in its cluster. Something like this will suffice (on each node):
127.0.0.1       localhost
127.0.1.1       ns1.haacksnetworking.com ns1

8.28.86.113     ns1.haacksnetworking.com ns1
8.28.86.114     ns2.haacksnetworking.com ns2
8.28.86.115     ns3.haacksnetworking.com ns3

2604:fa40:0:10::11  ns1.haacksnetworking.com ns1
2604:fa40:0:10::12  ns2.haacksnetworking.com ns2
2604:fa40:0:10::13  ns3.haacksnetworking.com ns3

# The following lines are desirable for IPv6 capable hosts
::1     localhost ip6-localhost ip6-loopback
ff02::1 ip6-allnodes
ff02::2 ip6-allrouters
A firewall is not strictly necessary so long as fail2ban is running, which ensures that heinous and/or repetitive queries get dropped. If you choose to go without a firewall, ensure you are strictly configuring all services and that you can recite every service listed in ss -tulpn by heart and why they need to be there. It is also okay to use a firewall so long as you do not use it as an excuse for misconfiguring your server(s). In my case, I use ufw which is simply a command line skin for iptables. It makes the configuration a little easier. Here are example configurations for each node:
Here is ns1.haacksnetworking.com:
ufw reset
ufw default deny incoming
ufw default allow outgoing
ufw allow 22/tcp
ufw allow 53/tcp
ufw allow 53/udp
ufw allow 80/tcp
ufw allow 443/tcp
ufw enable
Here is ns2.haacksnetworking.com:
ufw reset
ufw default deny incoming
ufw default allow outgoing
ufw allow 22/tcp
ufw allow 53/tcp
ufw allow 53/udp
ufw allow from 8.28.86.113 to any port 80 proto tcp
ufw allow from 8.28.86.113 to any port 443 proto tcp
ufw allow from 8.28.86.113 to any port 10000:10010 proto tcp
ufw allow from 2604:fa40:0:10::11 to any port 80 proto tcp
ufw allow from 2604:fa40:0:10::11 to any port 443 proto tcp
ufw allow from 2604:fa40:0:10::11 to any port 10000:10010 proto tcp
ufw enable
Here is ns3.haacksnetworking.com:
ufw reset
ufw default deny incoming
ufw default allow outgoing
ufw allow 22/tcp
ufw allow 53/tcp
ufw allow 53/udp
ufw allow from 8.28.86.113 to any port 80 proto tcp
ufw allow from 8.28.86.113 to any port 443 proto tcp
ufw allow from 8.28.86.113 to any port 10000:10010 proto tcp
ufw allow from 2604:fa40:0:10::11 to any port 80 proto tcp
ufw allow from 2604:fa40:0:10::11 to any port 443 proto tcp
ufw allow from 2604:fa40:0:10::11 to any port 10000:10010 proto tcp
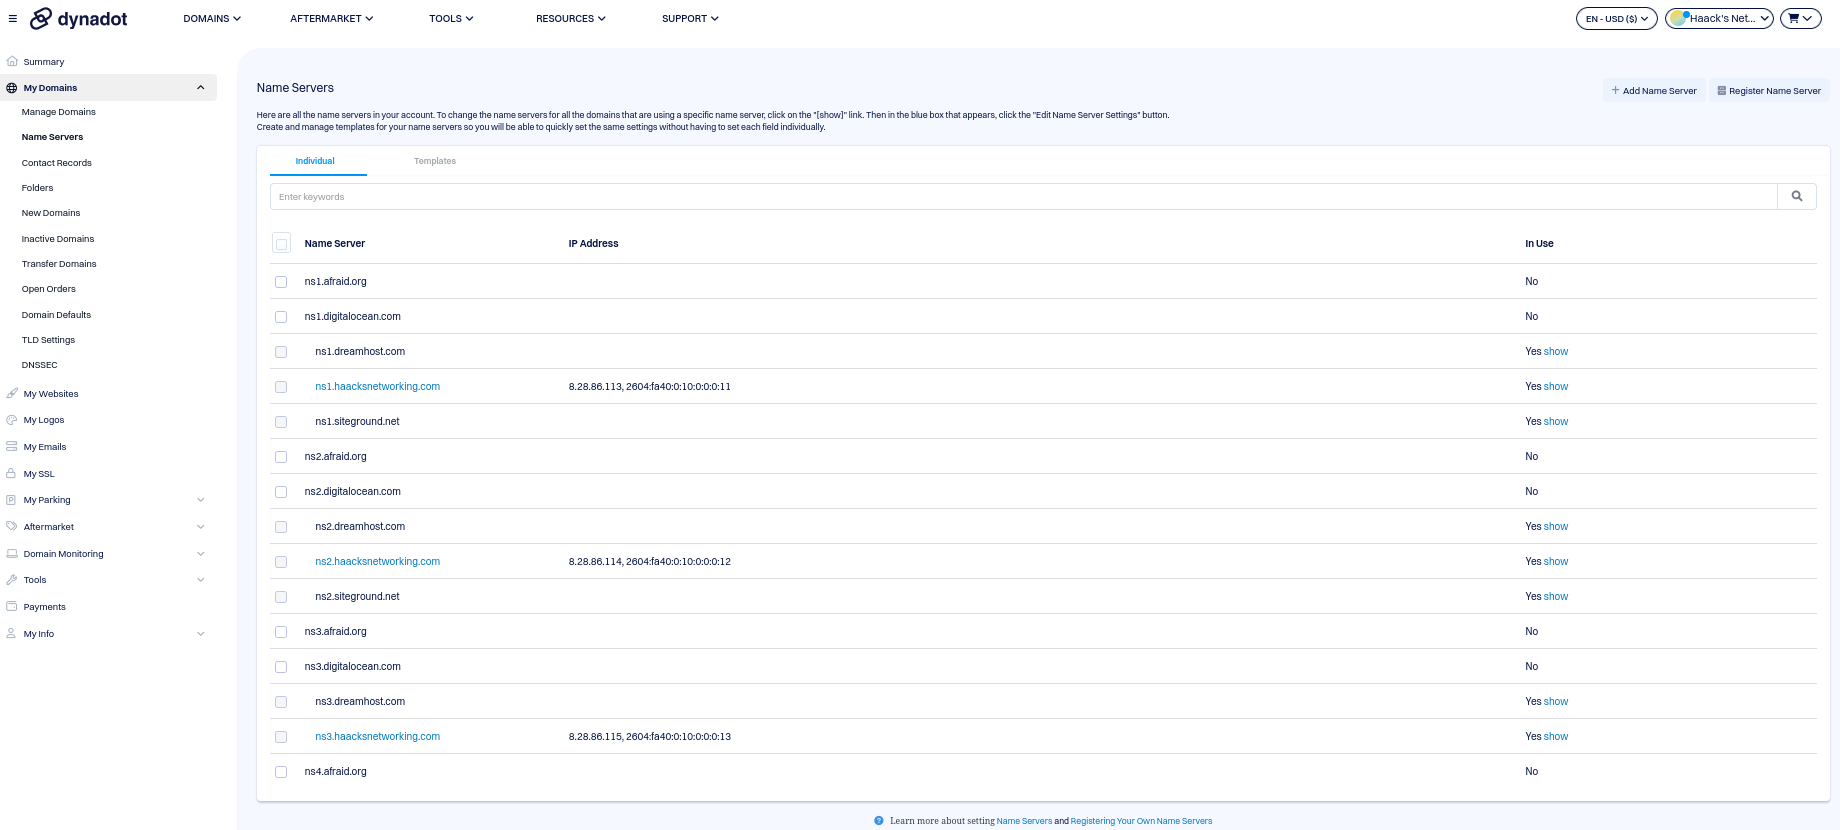
ufw enableAs you can see, ns2 and ns3 restrict all access on 80/443 to ns1. This is because there is no need to access these nodes directly, as both bind9 and later webmin will directly instruct these slaves with their configurations. Ns1, on the other hand, should be publicly accessible by design. We will secure it later with a strong password (25 characters or more), a reverse proxy, and fail2ban. One can additionally, if they so choose, add source-IP rules to the master node, but I think this is overkill. In my case, I want the master node to be accessible to me everywhere. The 10000-10010 range is for the webmin clustering features. Of course, none of the above is helpful unless you’ve registered your intended name servers with your registrar and established your glue records. I use Dynadot, and you first register the name servers, associate the IPs, and then you can leverage those nameservers, just like their nameservers, globally throughout their DNS host panel. Here’s what the name registration panel looks like:
Once the basics of your nodes and your registrar have the prerequisite configurations in place, we can move on to configuring the Bind9 server.
Part 2 – Setting up the Bind9 sever(s)
We can now establish the root zone on the master (ns1) and then tie the two slaves to it. Let’s open /etc/bind/named.conf.options and enter the following for the global configuration:
options {
    directory "/var/cache/bind";
    recursion no;
    allow-query { any; };
    allow-transfer { none; };
    listen-on { any; };
    listen-on-v6 { any; };
    minimal-responses yes;
};
It’s a good practice to check the configuration and restart the service after major changes. Let’s do that as well as provide proper ownership and perms to our zone configuration directory:
systemctl restart bind9
systemctl enable bind9
chown bind:bind /var/cache/bind/db.*
chmod 644 /var/cache/bind/db.*
named-checkconf
systemctl reload bind9
Now, let’s establish the haacksnetworking.com zone, required for the GLUE records and proper functioning of the authoritative part of the authoritative DNS server. Let’s open /etc/bind/named.conf.local and enter the following:
zone "haacksnetworking.com" {
    type master;
    file "/etc/bind/db.haacksnetworking.com";
    allow-transfer { 8.28.86.114; 8.28.86.115; 2604:fa40:0:10::12; 2604:fa40:0:10::13; };
    also-notify { 8.28.86.114; 8.28.86.115; 2604:fa40:0:10::12; 2604:fa40:0:10::13; };
};
Now that we’ve created the base server entry and created the master zone, we should restart the service and add a few items to the zone record file it creates for us. Let’s do systemctl restart bind9 and then edit /etc/bind/db.haacksnetworking.com. Remember, all we’ve done so far is create the zone itself and establish the zone record file location. We now need to open that location and enter the records we need both for the bind9 server itself and all of the nodes. We can setup some other common records at the same time:
$TTL    86400
@       IN      SOA     ns1.haacksnetworking.com. hostmaster.haacksnetworking.com. (
                        2025122401
                        3600
                        1800
                        604800
                        86400 )

@               IN      NS      ns1.haacksnetworking.com.
@               IN      NS      ns2.haacksnetworking.com.
@               IN      NS      ns3.haacksnetworking.com.

ns1             IN      A       8.28.86.113
ns2             IN      A       8.28.86.114
ns3             IN      A       8.28.86.115

ns1             IN      AAAA    2604:fa40:0:10::11
ns2             IN      AAAA    2604:fa40:0:10::12
ns3             IN      AAAA    2604:fa40:0:10::13

@               IN      A       8.28.86.113
@               IN      AAAA    2604:fa40:0:10::11

@               IN TXT "v=spf1 a mx ip4:8.28.86.113 ~all"
In my case, I had previously been using ISP Config for another hobbyist domain (for the kids and cats). So, I also configured that zone at the CLI, also in /etc/bind/named.conf.local, as follows:
zone "felinefantasy.club" {
    type master;
    file "/var/cache/bind/db.felinefantasy.club";
    allow-transfer { 8.28.86.114; 8.28.86.115; 2604:fa40:0:10::12; 2604:fa40:0:10::13; };
    also-notify { 8.28.86.114; 8.28.86.115; 2604:fa40:0:10::12; 2604:fa40:0:10::13; };
};
Now that the family and cat website zone is re-created, we can now establish its DNS records in the zone record file in /var/cache/bind/db.felinefantasy.club as follows:
$TTL 86400
@ IN SOA ns1.haacksnetworking.com. hostmaster.haacksnetworking.com. (
    2025122311
    3600
    1800
    604800
    86400
)

@               IN NS ns1.haacksnetworking.com.
@               IN NS ns2.haacksnetworking.com.
@               IN NS ns3.haacksnetworking.com.

@               IN A 8.28.86.119
@               IN AAAA 2604:fa40:0:10::16

@               IN TXT "v=spf1 a mx ip4:8.28.86.119 ip6:2604:fa40:0:10::16 ~all"

_dmarc          IN TXT "v=DMARC1; p=none; fo=1; pct=100; rua=mailto:dmarc@haacksnetworking.org"
Now that we’ve created our base server and two zones, we can configure ns2 and ns3 as slaves. This is a one-time manual change that’s required when doing all of this via the CLI. Eventually, we will cluster our instances using webmin which will create the zone file on the slaves upon creation on the master. At present, however, we are still covering how to do this manually using the CLI. Accordingly, here is the CLI stuffs we need to do on ns2 and ns3 in /etc/bind/named.conf.local on each node (one-time only):
zone "haacksnetworking.com" {
    type slave;
    file "/var/cache/bind/db.haacksnetworking.com";
    masters { 8.28.86.113; 2604:fa40:0:10::11; };
};
zone "felinefantasy.club" {
    type slave;
    file "/var/cache/bind/db.felinefantasy.club";
    masters { 8.28.86.113; 2604:fa40:0:10::11; };
};
This needs to be done on each node, i.e., ns2 and ns3. At this point, your base server and a handful of records are established so that also means it’s a good time to begin testing. Before testing your nodes, always remember to reload changes w/ systemctl reload bind9. I had many false positives that stemmed from failing to restart the service. For checking records, I did the following:
host haacksnetworking.com ns1.haacksnetworking.com
host haacksnetworking.com ns2.haacksnetworking.com
host haacksnetworking.com ns3.haacksnetworking.com
host felinefantasy.club ns1.haacksnetworking.com
host felinefantasy.club ns2.haacksnetworking.com
host felinefantasy.club ns3.haacksnetworking.com
These should all provide whatever A records we established above, however, during debugging or testing, it might be helpful to manually trigger ”rndc” to transfer the zones. You can do that as follows:
rndc retransfer haacksnetworking.com
rndc retransfer felinefantasy.club
At this point, we’re still dealing strictly with bind9 and have not setup webmin or the automated clustering features. We will do that soon, but there’s still one thing we need to cover how to do on the command line and that’s DNSSEC. Below, let’s create keys in the proper directory (mind this) and then sign them:
cd /var/cache/bind
dnssec-keygen -a ED25519 -b 256 -n ZONE haacksnetworking.com
dnssec-keygen -a ED25519 -b 256 -n ZONE -f KSK haacksnetworking.com
SALT=$(openssl rand -hex 8)
dnssec-signzone -S -K /var/cache/bind -A -3 $SALT -N INCREMENT -o haacksnetworking.com -t db.haacksnetworking.com
You can of course just run the openssl salt generation command by itself and manually insert the value, but someone had this online and I thought it was cool to share, whereby it creates a variable called SALT and then populates it into the subsequent command. Hilarious, and entirely not needed, but super fun. Once this is done, you’ve built the keys, you’ve signed the domain with them, and now you need to change the named entry to reflect the signed zone instead, and then finally update your registrar with the key and key values that you chose. First, let’s update nano /etc/bind/named.conf.local with the signed record file location, for which I am using the felinefantasy.club zone record as an example, but this would apply to whatever zone you signed:
zone "felinefantasy.club" {
    type master;
    file "/var/cache/bind/db.felinefantasy.club.**signed**";
    allow-transfer { 8.28.86.114; 8.28.86.115; 2604:fa40:0:10::12; 2604:fa40:0:10::13; };
    also-notify { 8.28.86.114; 8.28.86.115; 2604:fa40:0:10::12; 2604:fa40:0:10::13; };
    };
Once that’s done, head over to your registrar and enter the values accordingly. For me, I use Dynadot, so it looks like this for a new entry:
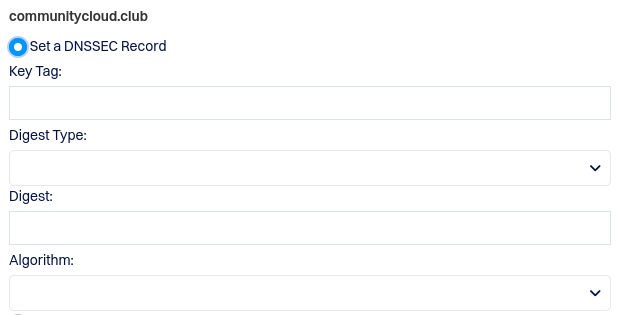
First, let’s confirm our key details with cat dsset-felinefantasy.club.inside cd /var/cache/bind. Upon doing that, you get something like the following:
felinefantasy.club. IN DS 42137 15 2 A1B2C3D4E5F67890123456789ABCDEF0123456789ABCDEF0123456789ABCDEFAfter that, and if you chose the same type of key as me, then your key tag is the 42137 and the algorithm is 15, which you can see right after the key tag. The digest type, #2, is assigned by name server authorities, which comes right after the digest type in the record above. Finally, you have the digest itself, which is:
A1B2C3D4E5F67890123456789ABCDEF0123456789ABCDEF0123456789ABCDEF
Enter all of these values, adjusting as needed, into your registrar’s DNSSEC section for this particular domain and you should be good to go. With this, we’ve completed the CLI portion of this tutorial. You can now, create a master bind9 server, two zones, two slaves that assist that master, and DNSSEC for any of those created zones/domains. The only caveat is that bind9 lacks an internal clustering system, so you do have to do the one-time config entry on each slave any time you create a new zone. This instructs the slave that it is an authority for this record and informs it as to who its master is for that zone/record. Our next job is to cover how to setup webmin and how to confgiure webmin to perform the same tasks we just did in the CLI with its bind9 web interface. Before moving on, make sure to verify your DNSSEC record with dig as follows ”dig felinefantasy.club DNSKEY +dnssec @8.28.86.113”. You should see some output resembling:
; <<>> DiG 9.20.15-1~deb13u1-Debian <<>> felinefantasy.club DNSKEY +dnssec @8.28.86.113
;; global options: +cmd
;; Got answer:
;; ->>HEADER<<- opcode: QUERY, status: NOERROR, id: 28842
;; flags: qr aa rd; QUERY: 1, ANSWER: 4, AUTHORITY: 0, ADDITIONAL: 1
;; WARNING: recursion requested but not available

;; OPT PSEUDOSECTION:
; EDNS: version: 0, flags: do; udp: 1232
; COOKIE: 411d85836fb93c0a010000006950b1756dbe071f8d5e5758 (good)
;; QUESTION SECTION:
;felinefantasy.club.		IN	DNSKEY

;; ANSWER SECTION:
felinefantasy.club.	86400	IN	DNSKEY	256 3 15 gsJX9BVwpBouYbMo1LcGAazEdI2dLR7jRoUvf0xghlU=
felinefantasy.club.	86400	IN	DNSKEY	257 3 15 X89v0cFjUj9aJ7iowuBsWB+kWlU/f1wDKkjlN9fU7bU=
felinefantasy.club.	86400	IN	RRSIG	DNSKEY 15 2 86400 20260123015214 20251224015214 5092 felinefantasy.club. M5mol/xWAMN3Z3Sq0QQtRlejACeJkI0MaZT2iD70DS8YkGTB1lY0NUil s+Ly1vMOWF9pPxNMRNbaHSJpx888AQ==
felinefantasy.club.	86400	IN	RRSIG	DNSKEY 15 2 86400 20260123015214 20251224015214 31408 felinefantasy.club. 8AFRfVowlWV9Gi65eZu+zWW6yg0ADCbUE/T6L1lou5Sls9kHE2M33HIM NaD0oMQHMyN+cLyIBfjR+aLR3acuCg==

;; Query time: 100 msec
;; SERVER: 8.28.86.113#53(8.28.86.113) (UDP)
;; WHEN: Sat Dec 27 21:26:29 MST 2025
;; MSG SIZE  rcvd: 399
Part 3 – Setting up Webmin
Okay, let’s start by installing webmin:
curl -o webmin-setup-repo.sh https://raw.githubusercontent.com/webmin/webmin/master/webmin-setup-repo.sh
sh webmin-setup-repo.sh
apt update
apt install webmin -y
Once webmin installs, it should already be listening on port 10000 and bound to localhost, but double check those entries and the required lines below in /etc/webmin/miniserv.conf:
bind=127.0.0.1
#only ^^ on ns1, leave this off ns2/ns3
listen=10000
redirect_ssl=1
redirect_host=ns1.haacksnetworking.com
#ns2/ns3 on other nodes
The slaves need to query the master’s web gui for the clustering functionality, so they cannot have the url requests restricted to localhost. The master ns1, on the hand, receives all requests from the localhost 127.0.0.1 via the reverse proxy. Since the reverse proxy is seated locally, passing those externally received requests upstream, there’s no issue and plenty of benefit from binding the master to localhost. The terminal webmin uses also needs to be configured for your origin so open /etc/webmin/xterm/config and enter:
host=ns1.haacksnetworking.com #ns2/ns3 on other nodes
Remember, you are configuring this on each node. Recall that we already pre-built all firewall rules in advance, allowing the slaves, in my case .114 and .115, to receive 80/443 and 10000-10010 requests from the master at .113. These are rules not present on the master .113, for example. Make sure to recall and make sense of those rules as we build the cluster. Before we move on, let’s make sure all of our webmin changes are active by restarting the service:
/etc/webmin/restart
The next step is to create our Let’s Encrypt certs for each domain. To do this, build the certs normally on the default 000-default.conf virtual host. Run certbot to create a certificate and let acme build a second vhost for 443, something like 000-default-le-ssl.conf or something similar. Once this is done, you simply swap the contents of the two blocks with the reverse proxy vhost confs instead. You only need to change ServerName nsX.haacksnetworking.com and nothing else. This is just a routine step I do to avoid self-signed or cert-only options which are annoying. So, once you built the cert and have both vhosts, swap them out and restart the services. First, let’s enable the reverse proxy and TLS modules, reload the service, then create a LE cert with certbot on the default host:
a2enmod proxy proxy_http proxy_wstunnel rewrite ssl headers
apache2ctl configtest
systemctl reload apache2
sudo apt install certbot letsencrypt python3-certbot-apache
sudo certbot --authenticator standalone --installer apache -d nsX.haacksnetworking.com --pre-hook "systemctl stop apache2" --post-hook "systemctl start apache2"
At this point, you should now have a cert for nsX.haacksnetworking.com. We can now swap the vhosts with our reverse proxy configurations and they will just work like magic when we restart the service. First, let’s change our http vhost in /etc/sites-enabled to the following:
<VirtualHost *:80>
    ServerName ns1.haacksnetworking.com

    RewriteEngine On
    RewriteCond %{HTTPS} off
    RewriteRule ^ https://%{HTTP_HOST}%{REQUEST_URI} [L,R=301]

    ProxyPass /.well-known !
</VirtualHost>
And, for https vhost in /etc/apache2/sites-enabled, use the following:
<VirtualHost *:443>

    ServerName ns1.haacksnetworking.com

    SSLEngine on
    SSLProxyEngine on

    SSLCertificateFile /etc/letsencrypt/live/ns1.haacksnetworking.com/fullchain.pem
    SSLCertificateKeyFile /etc/letsencrypt/live/ns1.haacksnetworking.com/privkey.pem
    Include /etc/letsencrypt/options-ssl-apache.conf

    SSLProxyCheckPeerCN off
    SSLProxyCheckPeerName off
    SSLProxyCheckPeerExpire off

    ProxyPass /.well-known !
    ProxyPass / https://127.0.0.1:10000/
    ProxyPassReverse / https://127.0.0.1:10000/

    RewriteEngine On
    RewriteCond %{HTTP:Upgrade} websocket [NC]
    RewriteCond %{HTTP:Connection} upgrade [NC]
    RewriteRule ^/?(.*) wss://127.0.0.1:10000/$1 [P,L]

    RequestHeader set X-Forwarded-Proto "https"
    RequestHeader set X-Forwarded-Port "443"

</VirtualHost>
Make sure to restart apache2 sudo systemctl restart apache2 after this. You should not have any errors so long as you adapted the locations and domains above to your use-case. If you do, it’s likely because you did not perform my trick correctly, i.e., you had failures on cert creation above. Use the apache configuration test tool, double check your steps, and carry on once you got things sorted. We are now going to setup the cluster and then use the cluster to enter another zone, an A record, and the corresponding DNSSEC signature for the zone/domain. The first step is to navigate to Webmin Servers Inde on ns1.haacksnetworking.com‘s webmin sidebar and select Register a new server once in that panel. It should look something like this:
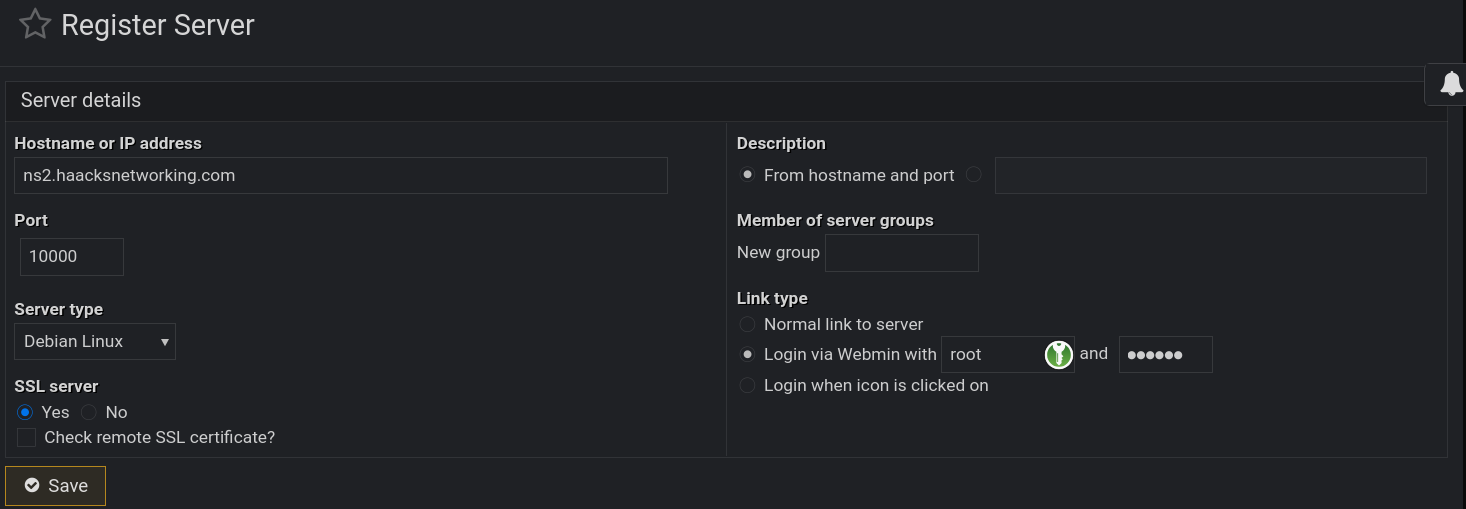
As you can see above, we are using the Login via Webmin with option with our root user’s UNIX credentials, which webmin leverages via pam. If you did not do so already, make sure to log in as root on each node, and set a unique 25 or larger character password with special characters, capitals, and no dictionary words. Use a generator like KeepassXC or Nextcloud Passwords. The key is random, unique, and large. So long as you got that in place, TLS and regular cron updating of your certs takes care of the rest, as does maintaining and patching each node. Again, if you are paranoid and/or have a rare qualifying use-case, you can certainly source-IP 80/443 on the master domain, ns1.haacksnetworking.com, but I’m content leaving the rest to fail2ban. Add both machines/nodes webmin instance to the master’s instance this way, until you have something resembling the following:
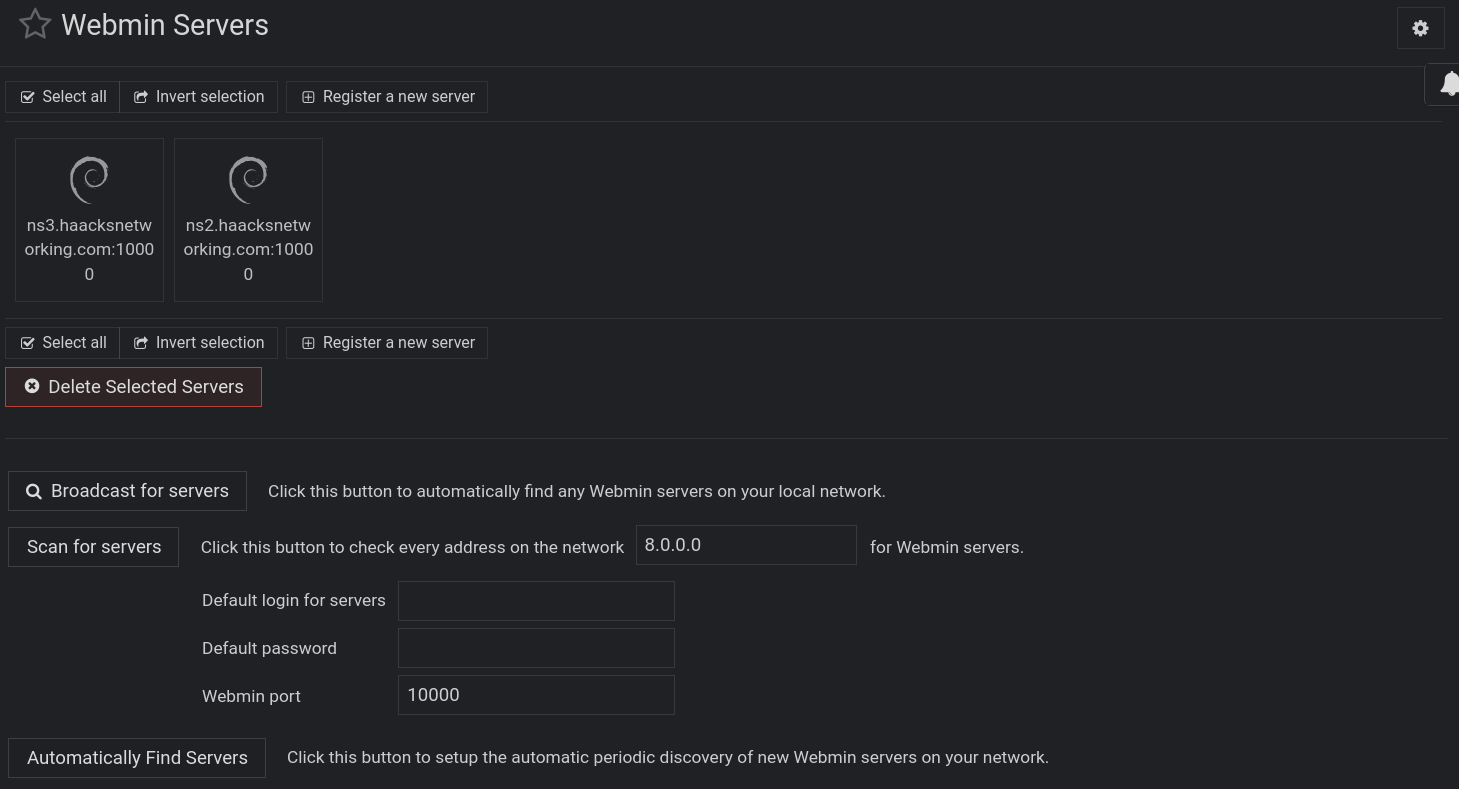
Once you’ve registered each node with the master’s webmin node, you can now select those nodes as bind9 server slaves in the gui. Navigate in the master’s webmin sidebar to Bind9 Server, and then select Cluster Slave Servers which is located here:
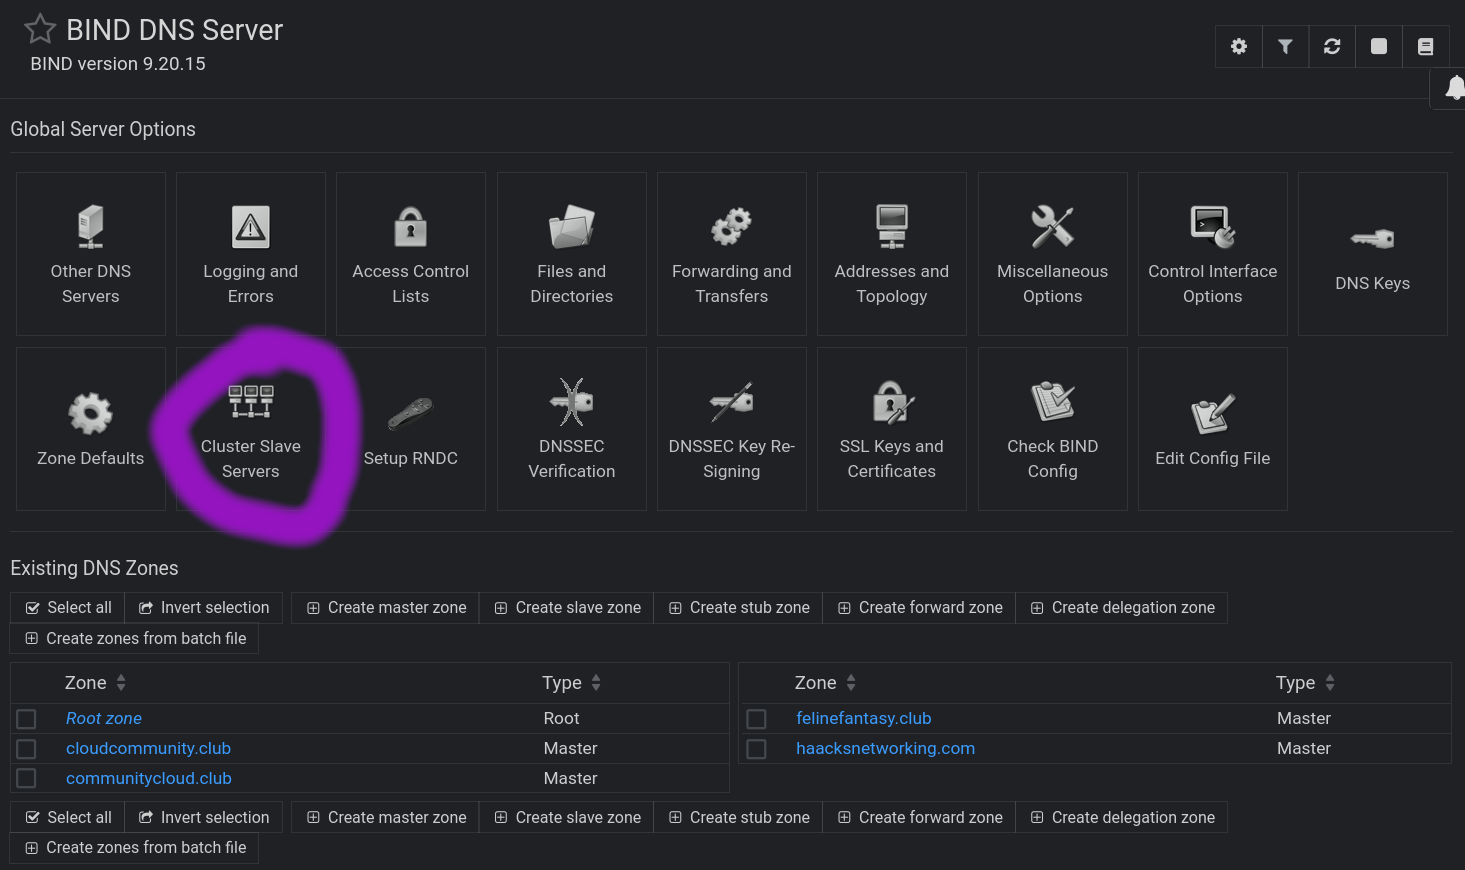
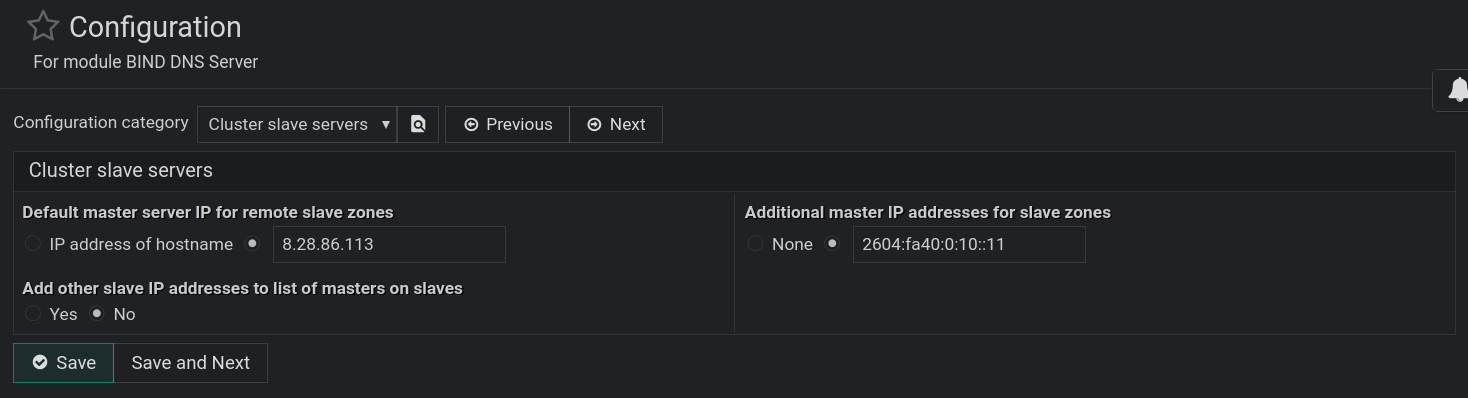
This one took a bit for me to figure out! The global bind9 settings, which are used to populate newly added zones – and which cannot be altered on the fly during zone creation – must be managed via the cog in the upper right of the Bind9 Server’s webmin gui. Here’s where you click:

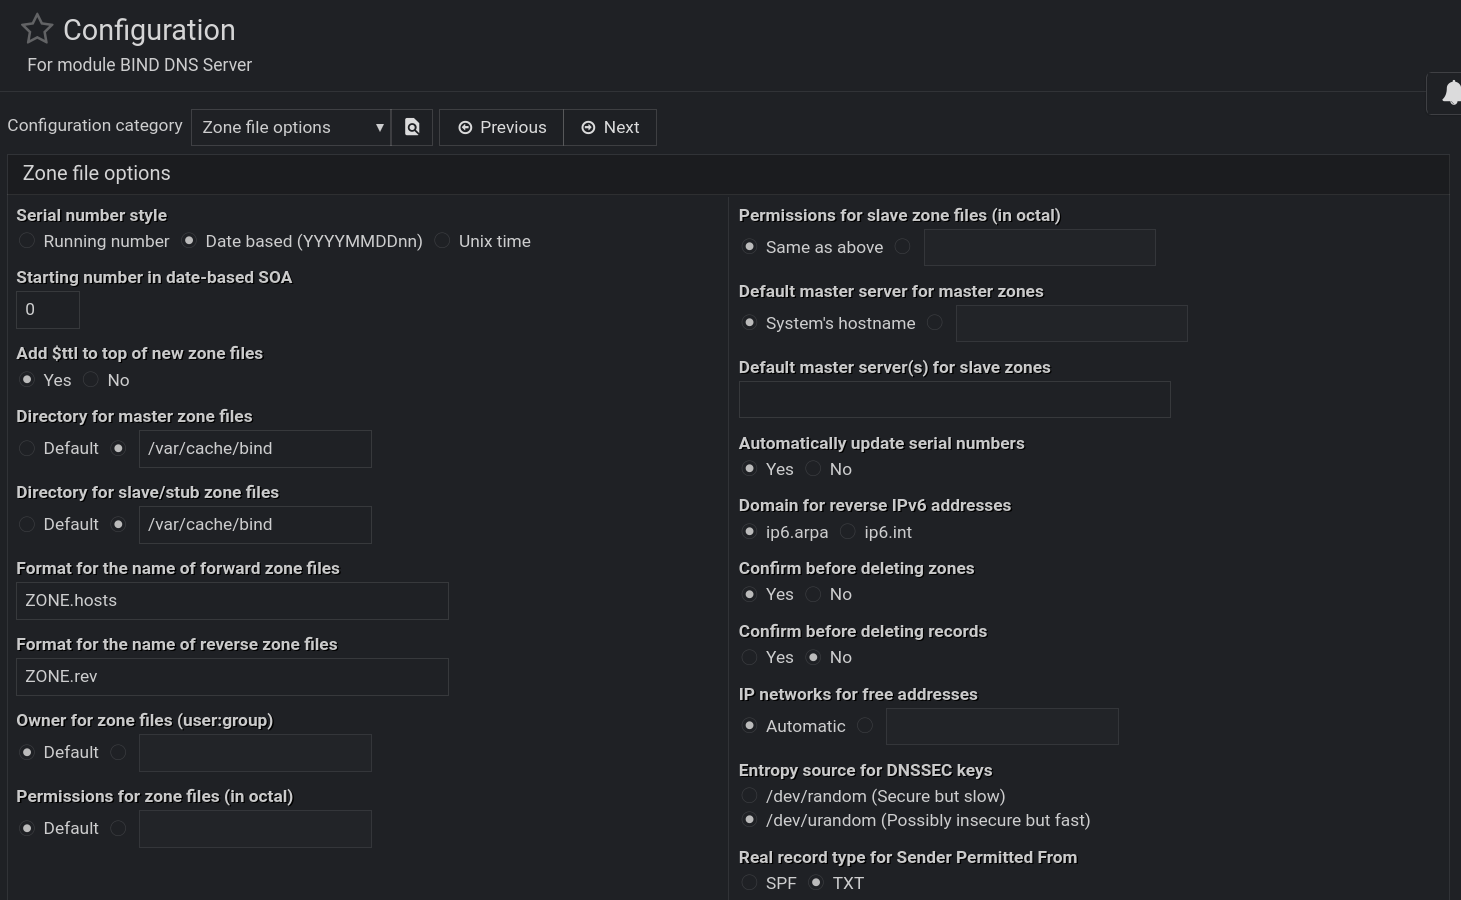
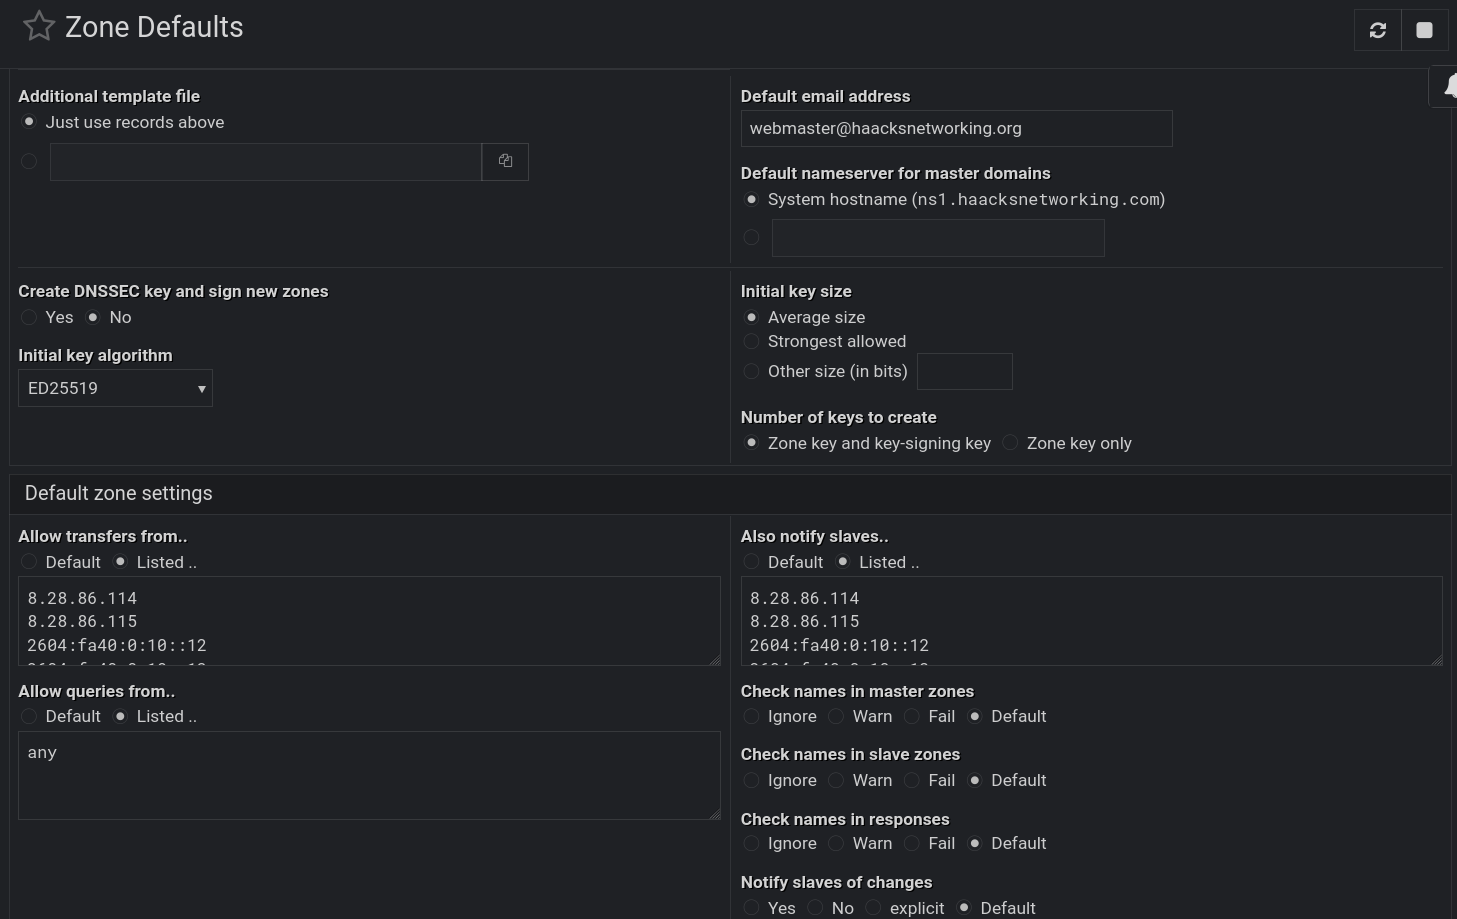
Inside that panel, you have five dropdowns that edit a global bind 9 config, which webmin uses to populate new zone builds. You want to edit two areas to be consistent with your bind9 CLI configurations. Specifically, you edit Cluster Slave servers and Zone file options editing the master server’s ipv4 and ipv6 address and specifying the default location for zone record files. Here’s what those options look like:
Before we create our first master zone using webmin’s bind9 GUI, let’s activate rndc. To do that, navigate to Bind9 Server > Setup RNDC. Here’s what that looks like below. Just click yes, and you are all set:

Once you do that, we can now create a new master zone. Here’s what that looks like. For me, all the default values are fine:
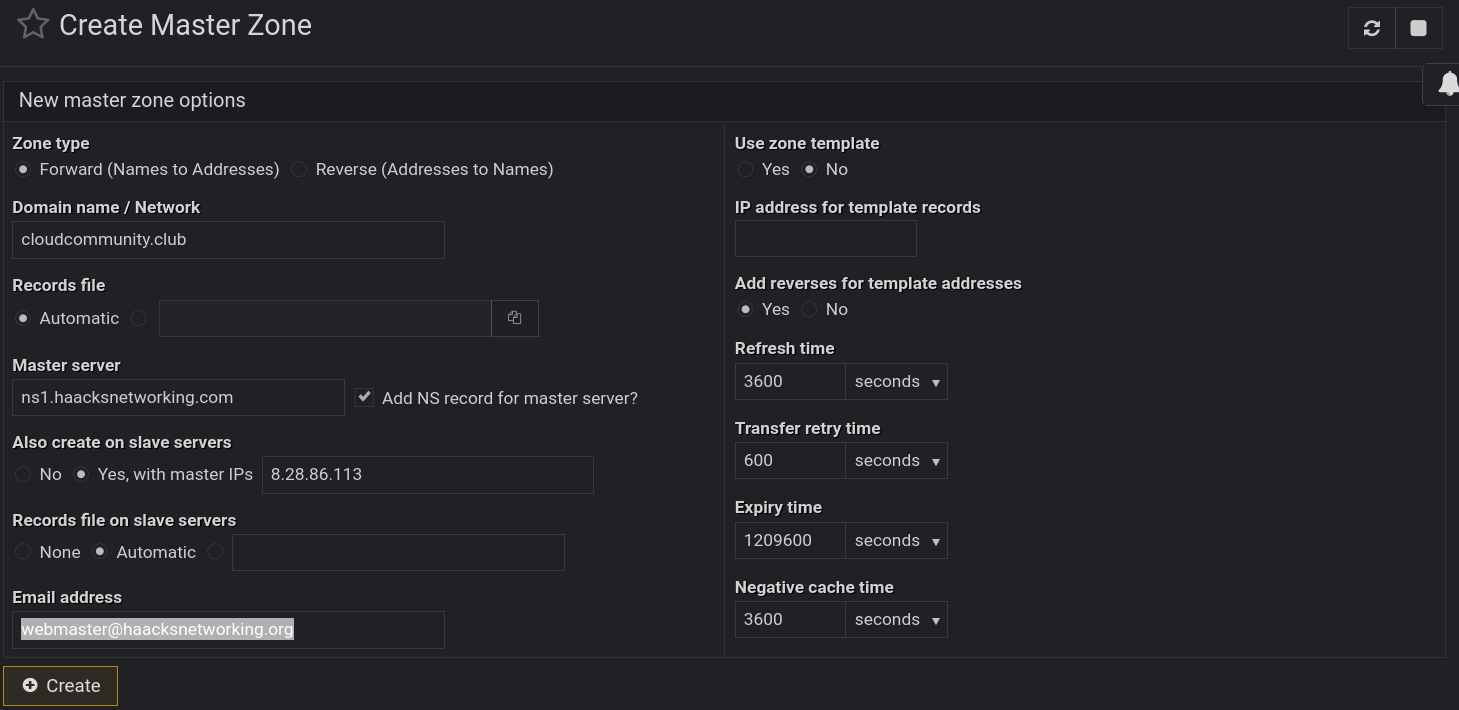
Doing this creates the zone on ns1. It looks a little different structurally than what I created on the CLI, but syntactically, it is equivalent. It used a different naming convention for the name of the zone file, but it is completely arbitrary. Here is /etc/bind/named.conf.local on ns1 for the newly created zone:
zone "cloudcommunity.club" {
type master;
file "/var/cache/bind/cloudcommunity.club.hosts.signed";
allow-transfer {
8.28.86.114;
8.28.86.115;
2604:fa40:0:10::12;
2604:fa40:0:10::13;
};
also-notify {
8.28.86.114;
8.28.86.115;
2604:fa40:0:10::12;
2604:fa40:0:10::13;
};
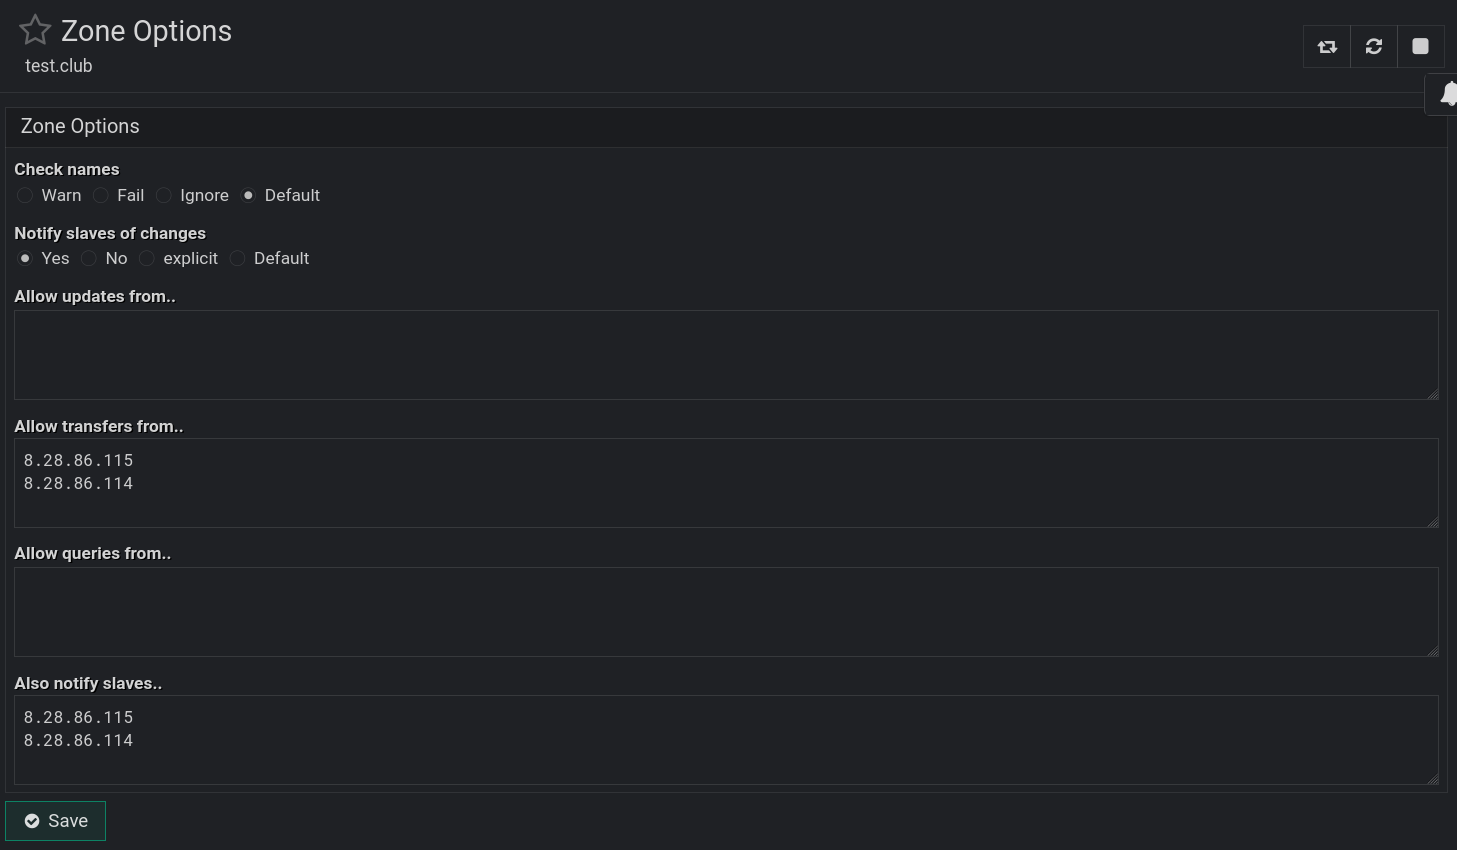
};The IPv6 addresses above did not populate despite me having those entered in webmin under Bind9 Server > Zone defaults. You can see them in that area below and you can see that a test.club domain lacks them despite being populated there as seen in the screenshot below:
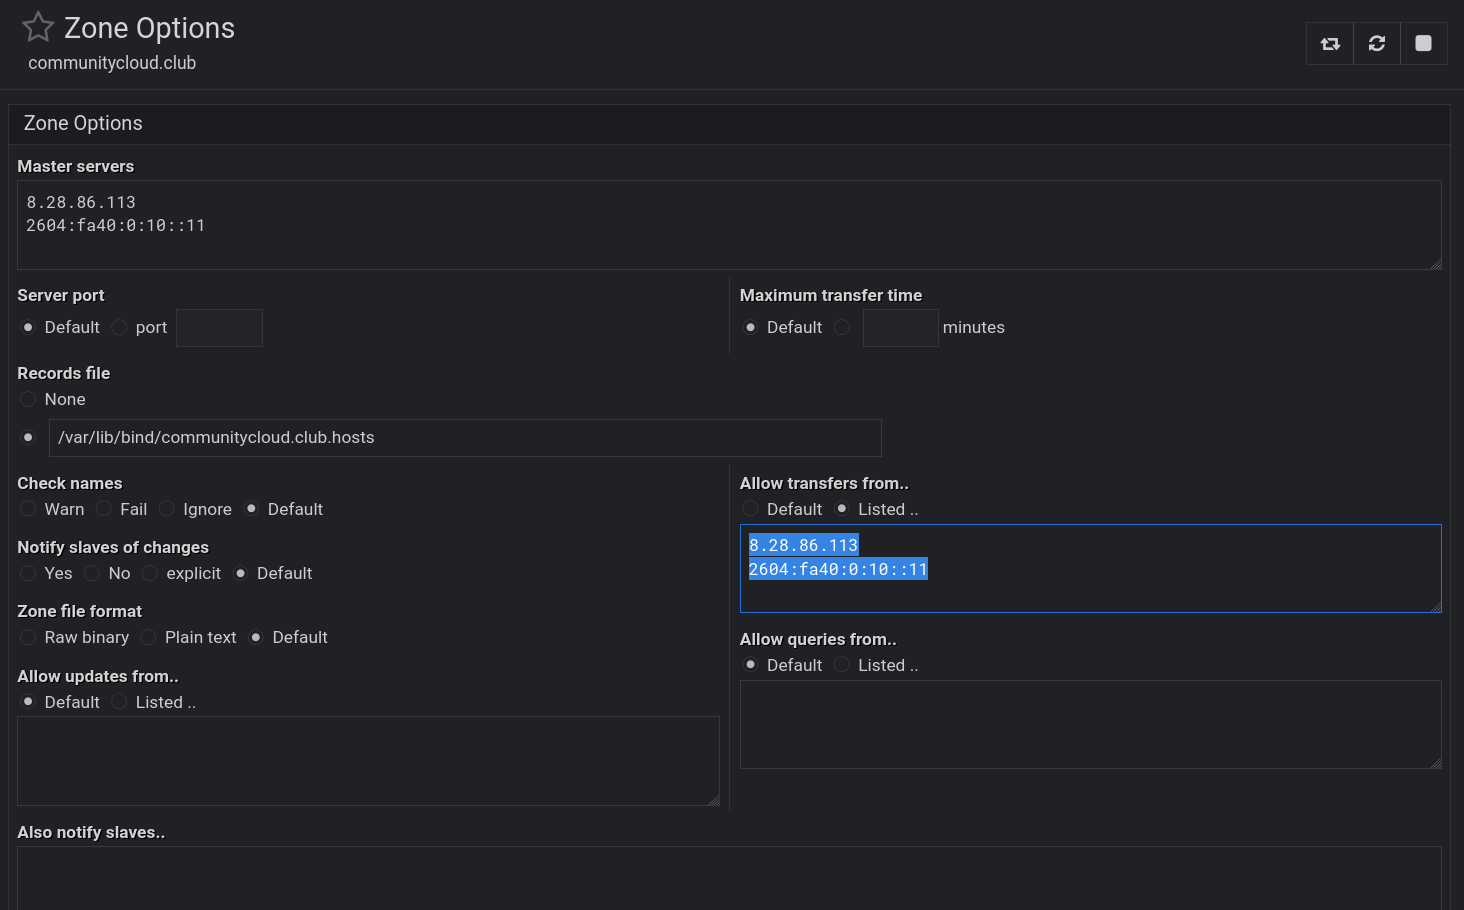
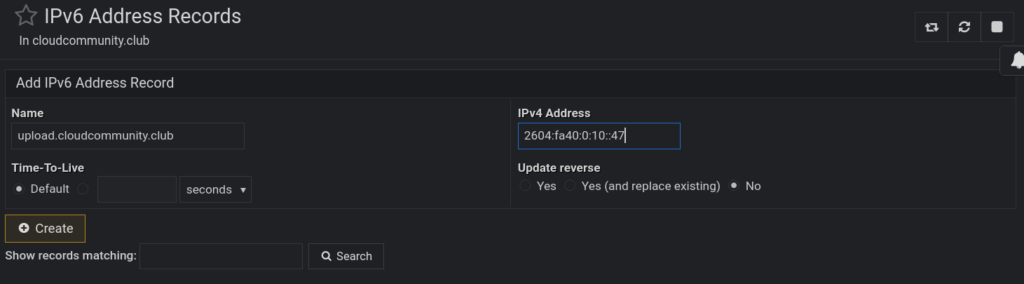
This glitch is a bit annoying, but it is not strictly required for the zone to function as only IPv4 is sufficient. If, however, you want to add the IPv6 entries, you do so by navigating to Bind9 Server > Zone Name > Edit Zone Options and simply add them:
It is not required to change anything on the slaves because these are master node entries and the slaves don’t require any of these blocks. The slaves, on the other hand, have created corresponding zone entries like follows in /etc/bind/named.conf.local:
zone "cloudcommunity.club" {
        type slave;
        masters {
                8.28.86.113;
                2604:fa40:0:10::11;
                };
        allow-transfer {
                8.28.86.113;
                2604:fa40:0:10::11;
                };
        file "/var/lib/bind/cloudcommunity.club.hosts";
        };
Webmin redundantly creates the transfer rule, but that won’t hurt or change anything because it is moot due to the type slave; declaration earlier. Therefore, this can be left along during initial zone and record creation as it is harmless. If you want to remove those redundant entries, you go to Webmin on ns1 > Webmin Servers Index > Click ns2 or ns3 as needed > Bind9 Server > Zone > Edit Zone Options. In there, you can easily remove the redundant entries:
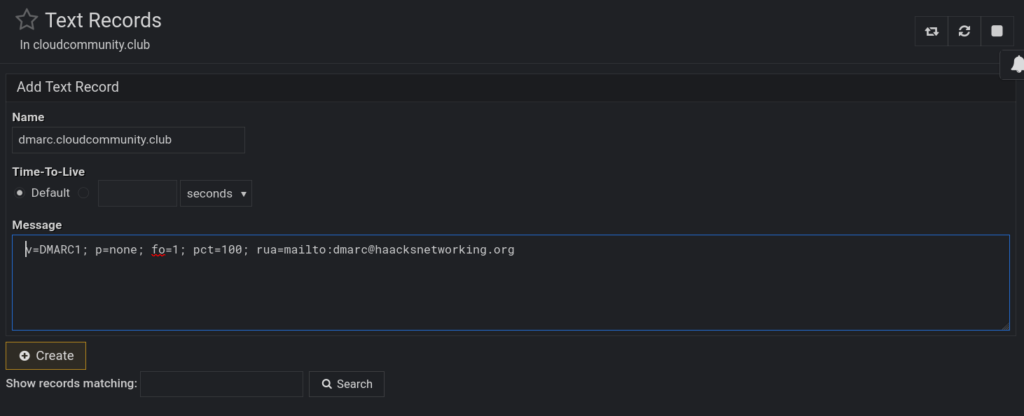
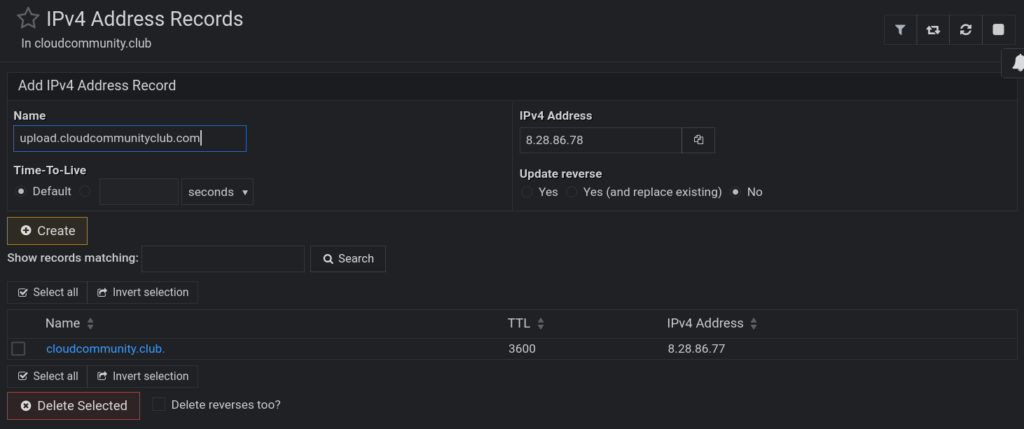
Of course, you could also shell into the slaves and remove those transfer rules via the CLI, this is just to show that both methods work and are dealing with the exact same bind9 underbelly. Once we do that, we can !!FINALLY!! create A, AAAA, dmarc, spf, and or any other records we need. Here’s what the zone’s landing page looks like and what the record pages within it look like:

Now, we do some host testing again. Repeat host commands above
host cloudcommunity.club ns1.haacksnetworking.com
host cloudcommunity.club ns2.haacksnetworking.com
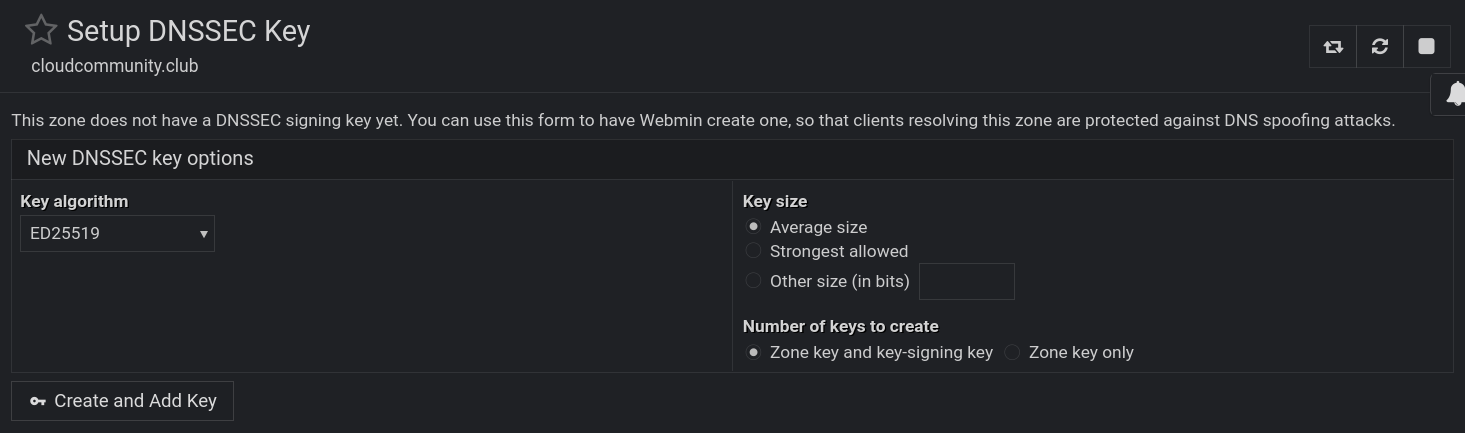
host cloudcommunity.club ns3.haacksnetworking.comOnce that’s working, let’s setup DNSSEC using the webmin gui on master ns1. To do that navigate to Bind9 DNS Server > Zone > Setup DNS Key:
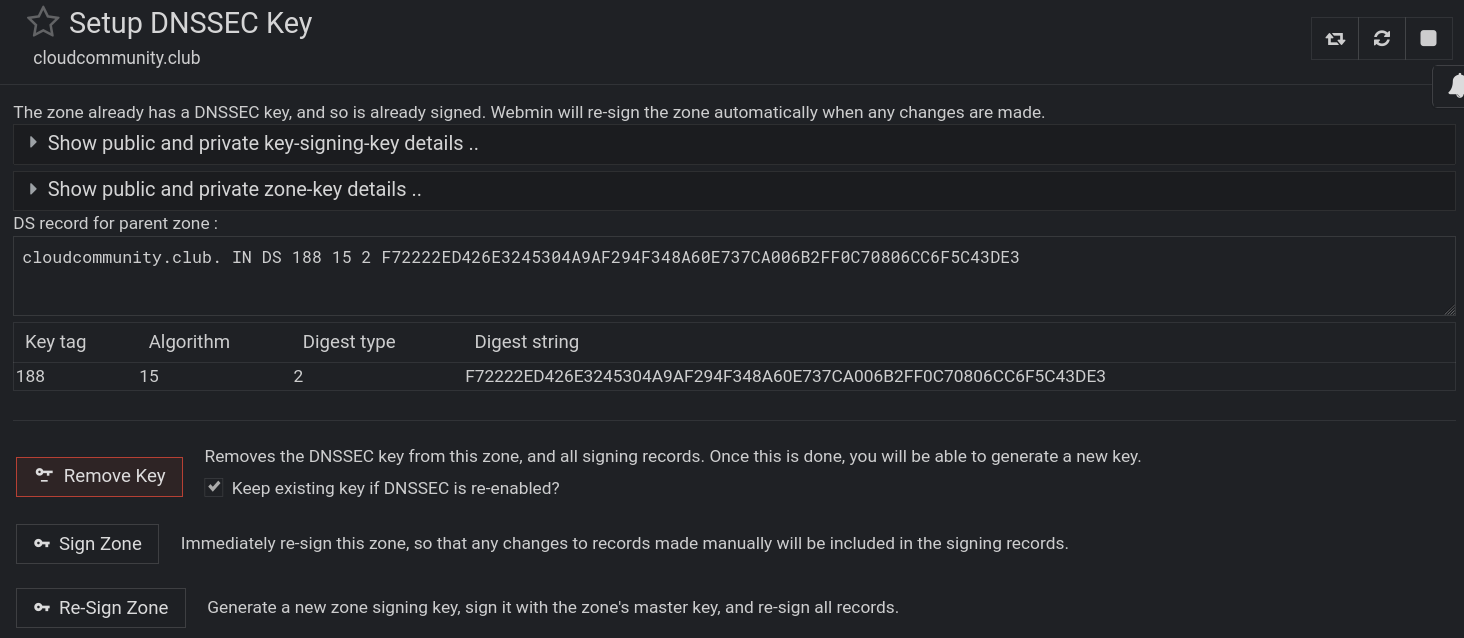
Once the DNSSEC key is created and the zone signed, you will, just like above, have to navigate over to your registrar and enter in the algorithm, digest, digest tag, and key tag. To see those values, just select Bind9 DNS Server > Zone > Setup DNS Key and instead of showing you the option to create it anew, it now shows the key you just created:
As a final step, we can use the dig command to verify the record against all nodes:
dig cloudcommunity.club DNSKEY +dnssec @8.28.86.113
dig cloudcommunity.club DNSKEY +dnssec @8.28.86.114
dig cloudcommunity.club DNSKEY +dnssec @8.28.86.115
Each node should report the following:
; <<>> DiG 9.20.15-1~deb13u1-Debian <<>> cloudcommunity.club DNSKEY +dnssec @8.28.86.113
;; global options: +cmd
;; Got answer:
;; ->>HEADER<<- opcode: QUERY, status: NOERROR, id: 21022
;; flags: qr aa rd; QUERY: 1, ANSWER: 4, AUTHORITY: 0, ADDITIONAL: 1
;; WARNING: recursion requested but not available

;; OPT PSEUDOSECTION:
; EDNS: version: 0, flags: do; udp: 1232
; COOKIE: f9d0bef39e0c56da010000006950c6e270c6a99b26e97171 (good)
;; QUESTION SECTION:
;cloudcommunity.club.		IN	DNSKEY

;; ANSWER SECTION:
cloudcommunity.club.	3600	IN	DNSKEY	256 3 15 yCykkNhKUB0H3F7B+F1ydS6lmTaQAhRkVLgq6Fy6xWo=
cloudcommunity.club.	3600	IN	DNSKEY	257 3 15 g61Yq+dJTUxZpQDvQfqqK59CUv3IsDXyO8Sy229YVic=
cloudcommunity.club.	3600	IN	RRSIG	DNSKEY 15 2 3600 20260123020922 20251224020922 188 cloudcommunity.club. sbVDXR4RZpR0s2eXn3wyyJ4JGO2AZpX/81UiOp/6fv9BWlVhkGXnsr50 JMHTFiKTVRwPtfRFONdrU1VUhrScDQ==
cloudcommunity.club.	3600	IN	RRSIG	DNSKEY 15 2 3600 20260123020922 20251224020922 30893 cloudcommunity.club. AjoUcCUneoXo/sTDgyfbAJV5wc/TxuJN50Uhs2WY6B8FfBV586ZCcell ztTYercorXsQf1mtHXpSh5bKZBscCg==

;; Query time: 100 msec
;; SERVER: 8.28.86.113#53(8.28.86.113) (UDP)
;; WHEN: Sat Dec 27 22:57:54 MST 2025
;; MSG SIZE  rcvd: 402
Part 4 – Optional Unbound Recursive Resolver
Now that you can create any record you please and sign your zones/domains with DNSSEC using both the CLI and the webmin Bind9 DNS server GUI, we can optionally secure each node with unbound DNS for added privacy and speed.
sudo apt install unbound
The full unbound tutorial, including lan-side setups, can be found Unbound. For this setup, however, simply install unbound sudo apt install unbound and drop a simple config in /etc/unbound/unbound.conf such as this:
server:
  # Bind to localhost only
  interface: 127.0.0.1
  interface: ::1
  port: 5335
  do-ip4: yes
  do-ip6: yes
  prefer-ip6: yes
  access-control: 127.0.0.0/8 allow
  access-control: 0.0.0.0/0 refuse
  access-control: ::0/0 refuse
  # Optimize for 8 cores
  num-threads: 4
  msg-cache-slabs: 4
  rrset-cache-slabs: 4
  infra-cache-slabs: 4
  key-cache-slabs: 4
  # Cache settings for high query volume
  cache-max-ttl: 86400
  cache-min-ttl: 3600
  rrset-cache-size: 128m
  msg-cache-size: 64m
  key-cache-size: 32m
  neg-cache-size: 8m
  # Enable prefetch and expired responses
  prefetch: yes
  prefetch-key: yes
  serve-expired: yes
  serve-expired-ttl: 3600
  # DNSSEC validation for DANE
  #do-dnssec: yes
  harden-dnssec-stripped: yes
  harden-referral-path: yes
  harden-below-nxdomain: yes
  harden-algo-downgrade: no
  # Performance tweaks
  #so-rcvbuf: 4m
  #so-sndbuf: 4m
  edns-buffer-size: 1232
  outgoing-range: 4096
  num-queries-per-thread: 1024
  jostle-timeout: 200
  #low-resolver-mem: no
  # Logging (minimal)
  verbosity: 1
  log-queries: no
  log-replies: no
  use-syslog: yes
  # Security and privacy
  hide-identity: yes
  hide-version: yes
  use-caps-for-id: yes
  qname-minimisation: yes
  harden-large-queries: yes
  harden-glue: yes
  aggressive-nsec: yes
  # Protocol settings
  do-tcp: yes
  do-udp: yes
  # Disable subnetcache
  module-config: "validator iterator"
It’s crucial to bind unbound to 5335 since bind9 is already listening on 53. In order to have local recursive queries use unbound, we need to hijack all outbound resolver queries to /etc/resolv.conf to use 5335. To be clear, make sure /etc/resolv.conf has the following entries:
nameserver ::1
nameserver 127.0.0.1
After that, adjust the ufw rules to hijack all 53 url queries and send them to 5335. Open /etc/ufw/before.rules and enter the following block at the end:
# === Added NAT table for local DNS redirection to Unbound on port 5335 ===
*nat
:PREROUTING ACCEPT [0:0]
:OUTPUT ACCEPT [0:0]
:POSTROUTING ACCEPT [0:0]

# Redirect local DNS queries sent to 127.0.0.1:53 → 127.0.0.1:5335
-A OUTPUT -d 127.0.0.1/32 -p udp --dport 53 -j REDIRECT --to-ports 5335
-A OUTPUT -d 127.0.0.1/32 -p tcp --dport 53 -j REDIRECT --to-ports 5335

COMMIT
# === End of added section ===
Make sure you can ping a common website on both ipv4 and ipv6 and you should be good to go:
ping4 google.com
ping6 google.com
If you are interested in setting up one of these authoritative Bind9 DNS clusters that are configured to use either CLI or the convenient webmin interface, just hit me up on Matrix.
Happy Hacking !!
Kindly,
oemb1905