- dnshijacks
- Jonathan Haack
- Haack’s Networking
- webmaster@haacksnetworking.org
//DNS Hijacks//
Latest Updates on Wiki: https://wiki.haacksnetworking.org/doku.php?id=computing:dnshijacks
This tutorial is for owner’s of cameras and/or IoT devices that want to monitor/secure their network from the device. As is well known, these devices ‘phone home’ and/or use built-in DNS to ensure connectivity but in so doing, bypass LAN policies and/or security. This tutorial assumes you already have a functioning openWRT-based LAN or equivalent. [[https://wiki.haacksnetworking.org/doku.php?id=computing:openwrt|In my case]], I use a pair of Flint 2 GL.Inet routers, with one routing and the other acting as a dump AP. Once you have that in place, the first thing to do is identify the cameras and assign them static IPS. You can do this in LuCI > Network > DHCP > Static Leases. Although I prefer using the MAC addresses for the remaining openWRT rules, the static addresses are indispensable for using tcpdump to monitor traffic during setup.

After your statics are set, the next task is to stop the cameras or IoT devices from directly querying external DNS servers. Most devices that do this directly contact the upstream DNS IP on either port 53 or port 853. It is true that 853 can be used for DoT – but that’s not what we are stopping right now. Here, we are stopping alternate port direct udp DNS queries which can also use 853. To stop outgoing packets on 53 and 853, we use openWRT’s port forward logic in the firewall. To get there, navigate to LuCI > Network > Firewall > Port Forwards. Once in that section, click Add and enter something like the following:
- Name: Camera1
- Restrict to address family: ipv4 #use what your devices use
- Protocol: TCP + UDP
- Source zone: res #pick your zone/subnet/vlan, ideally dedicated for cams/IoT devices
- External port: 53
- Destination zone: Any
- Internal IP address: 172.66.66.150 (ns5.haacksnetworking.org) #redirects traffic to my DNS server, a pihole + unbound
- Internal port: 53
- Advanced Settings
- Source MAC address: 80:48:2C:44:C7:7D 80:48:2C:41:71:78 80:48:2C:41:69:FF 80:48:2C:46:0E:C4
Once this is done, duplicate the rule and change the external port to 853. If your devices listen on ipv6, make a separate ipv6 rule with a separate ipv6 DNS target. In my case, the v4 Wyze cameras I used only accepted ipv4 addresses. I checked on the router to be sure with ”ip -6 neigh show dev br-lan.179”. Once you have built your port forwards, you should have something similar to the following:
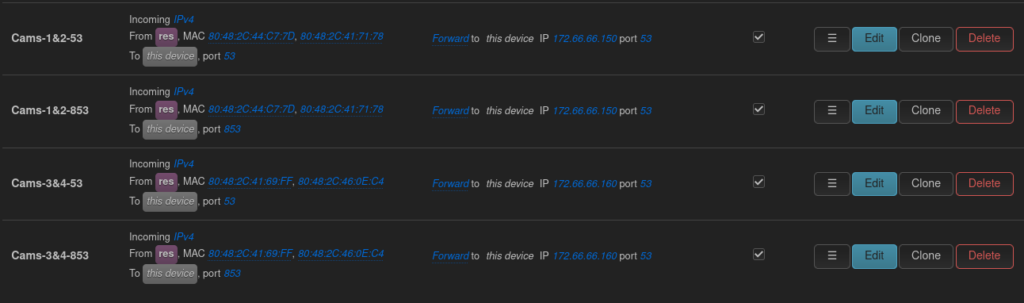
In the openWRT tutorial linked at the top, you will see that I use two nameservers for each vlan/subnet. Each of those nameservers is a pihole+unbound and each has an ipv4 and ipv6 address that I assign in openWRT and which get pushed to clients for DNS. This means each vlan/subnet has 4 DNS IP addresses pushed out. Having two is helpful if you are updating one and/or one of them goes down for a backup, etc. Normally the secondary nameserver gets few hits, only backing up the other when/if needed. Since we are hijacking DNS packets, however, I figured why not split up the load, so in the picture above, you will see that I sent two cameras packets to ns5 .150 and the other two cameras to ns6 .160. When I first placed the cameras on the vlan/subnet, there were no urls in the pihole’s dashboard from the cameras. After putting these rules in place, you immediately saw the time servers, APIs for logging in, and all other requests populating nicely. Okay, now that we are hijacking outgoing udp53 and udp853, let’s ensure that there’s not an embedded DNS over https, or DoH that can bypass those forwards. To do that, we setup a traffic rule. Let’s go to LuCI > Network > Firewall > Traffic Rules. In there, let’s set up something like the following:
- Name: Camera DoH
- Family: IPv4 and IPv6
- From: zone “res”
- Specify the MACs: 80:48:2C:41:69:FF 80:48:2C:41:71:78 80:48:2C:44:C7:7D 80:48:2C:46:0E:C4
- To: zone
wan - IPs to block: 1.1.1.1 1.0.0.1 8.8.8.8 8.8.4.4 9.9.9.9 149.112.112.112 94.140.14.14 94.140.15.15 208.67.222.222 208.67.220.220 185.228.168.9 185.228.169.9 76.76.2.0 76.76.10.0 45.90.28.0 45.90.30.0 2001:4860:4860::8888 2001:4860:4860::8844 2606:4700:4700::1111 2606:4700:4700::1001 2620:fe::fe 2620:fe::9 2a10:50c0::ad1:ff 2a10:50c0::ad2:ff 2620:119:35::35 2620:119:53::53 2a0d:2a00:1::1 2a0d:2a00:2::1 2606:1a40:: 2606:1a40:1:: 2a07:a8c0:: 2a07:a8c1::
- Ports: 443 853
- Action: Drop #or Reject
Once that’s done, you should have a rule that looks something like this:

Now that everything is setup, you need to ensure that there are no leaks. This is easily done with tcpdump on the router. There’s many different tests we can run, for example, we can tcpdump the static IPs to see what requests they are making on port 53/853. This is helpful during initial setup because it can help you see what requests the cams/IoT device is making so you know which approach to take and/or which ports/IPs to block. You do this by:
tcpdump -ni br-lan.179 host 172.66.66.105 or host 172.66.66.106 or host 172.66.66.107 or host 172.66.66.108 | egrep '(.53 |.853 )'This command above will pull out all 53 or 853 outgoing packets and you can see what upstream DNS the cams/IoT device is using. When I began this tutorial, I ran this command first and you could clearly confirm that online reports were correct and the Wyze v4 cams were sending outgoing udp/53 requests to 8.8.8.8 and 8.8.4.4, which are Google’s public DNS servers. Nevertheless, once everything is setup, you want to make sure there are no leaks. The way to do that is by running tcpdump on the wan/wan6 interface to see if anything we hijacked or dropped is sneaking out. First, confirm the wan/wan6 interface name by running ”uci get network.wan.device” and ”uci get network.wan6.device”. On the Flint 2, these are both eth1. First, I wanted to make sure that no there were no leaks on 53/853, which was the request I initially spotted, so I sniffed the wan interface to see if any udp53 or udp853 requests were getting out.
tcpdump -ni eth1 '(udp port 53 or udp port 853)' and '( host 8.8.8.8 or host 8.8.4.4 )'
tcpdump -ni eth1 ip6 and '(udp port 53 or udp port 853)' and '( host 2001:4860:4860::8888 or host 2001:4860:4860::8844 )'
To be clear, the above command is checking both 53 and 853 for plain text udp requests. Although rare, you can do this on port 853 but do not confuse that with DNS over TLS, which I tested next. To my surprise, I initially saw requests sneaking out. As it turns out, this was because I had wrongly set the destination zone on the hijack to the same zone as the origin. This, however, is wrong because obviously these external IPs are not within the source zone. So, I removed the destination zone and left it as “Any,” which creates an outgoing wildcard of sorts, allowing openWRT to forward those packets regardless of where it is heading. I adjusted the forward and then sniffed while rebooting the cameras and nothing got by. It should also be noted that the port forward rules for 53/853 above were careful to specify both udp and tcp in the logic. This is because cams/IoT devices can use port 853 for either plain text udp requests and/or for DNS over TLS, or DoT requests. By having both tcp/udp specified, openWRT will also catch any outgoing DoT requests. To test for DoT leaks, I ran the following commands:
tcpdump -ni eth1 tcp port 853 and '( host 8.8.8.8 or host 8.8.4.4 )'
tcpdump -ni eth1 ip6 and tcp port 853 and '( host 2001:4860:4860::8888 or host 2001:4860:4860::8844 )'
I only ran these commands for port 853 because it is impossible to do DoT on port 53. After rebooting the devices a few times and waiting five minutes, I confirmed that there were no DoT requests sneaking out. I had not seen any during initial testing, nor did online sources state that v4 cams were known to do this, but it’s harmless to set the logic and better safe than sorry. Now that those leaks were stopped and/or confirmed not happening, it was time to test DoH. Similarly, there were no reports online that Wyze cams using DoH, but there’s no reason to let a firmware update add that feature down the road and then have no prohibition. Better to set the rule now instead of being sorry later. To confirm no DoH requests were getting out, I ran the following:
tcpdump -ni eth1 tcp port 443 and '( host 8.8.8.8 or host 8.8.4.4 )'
tcpdump -ni eth1 ip6 and tcp port 443 and '( host 2001:4860:4860::8888 or host 2001:4860:4860::8844 )'
If the cams/IoT devices are sending out DoH requests, these commands will spot those leaks. Since I had not seen the Wyze v4 cams ping anything besides Google in testing, I restricted the commands to Google’s DNS servers. If needed, however, you can adjust the IPs above to include all of the blocked IPs in the traffic rule above. Here are the more inclusive commands:
tcpdump -ni eth1 tcp port 443 and '(host 8.8.8.8 or host 8.8.4.4 or host 1.1.1.1 or host 1.0.0.1 or host 9.9.9.9 or host 149.112.112.112 or host 94.140.14.14 or host 94.140.15.15 or host 208.67.222.222 or host 208.67.220.220 or host 185.228.168.9 or host 185.228.169.9)'
tcpdump -ni eth1 ip6 and tcp port 443 and '(host 2001:4860:4860::8888 or host 2001:4860:4860::8844 or host 2606:4700:4700::1111 or host 2606:4700:4700::1001 or host 2620:fe::fe or host 2620:fe::9 or host 2a10:50c0::ad1:ff or host 2a10:50c0::ad2:ff or host 2620:119:35::35 or host 2620:119:53::53 or host 2a0d:2a00:1::1 or host 2a0d:2a00:2::1)'
Once everything is set up and you’ve confirmed you have no leaks, you can return to your pihole dashboard and start evaluating urls that the cameras/IoT devices are contacting. Prior to this, the dashboard was empty, but now that direct udp on 53/853, DoT on 853, and DoH on 443 are all either hijacked or dropped, you should see it fill up nicely. Here’s a shot from each pihole, ns5 and ns6, after a few minutes.
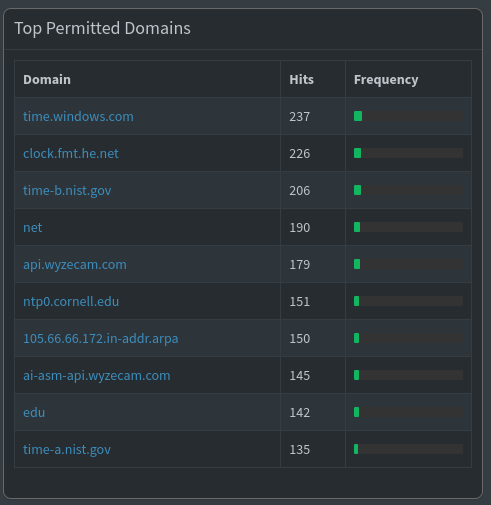
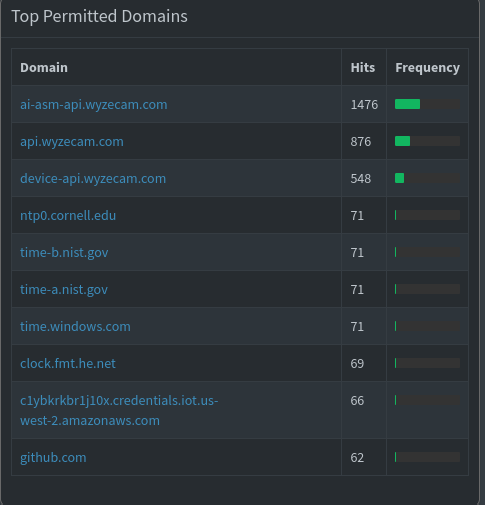
For whatever reason, the cams are using FOUR timeservers! Also, despite turning off all cloud-based features, the Wyze cameras continually ping home to ”c1ybkrkbr1j10x.credentials.iot.us-west-2.amazonaws.com”. Not only do they ping home still, they do so at an alarming rate. Next, I used pihole’s domain-level blocking to add a deny rule for the extra time servers and the cloud domain that I was not using. I left the .gov timeserver so I could get proper timestamps, but I saw no reason why they needed the other 4 servers, especially one called ”time.windows.com” lol. This home network is not pinging any ”windows.com” domain on principle. The point, however, is that now that you’ve properly secured your gateway leaks, you can easily use a DNS tool like the pihole to visually inspect what your cams/IoT devices are doing and block accordingly. Additionally, I looked online and forum hunted for any other potential “phone home” urls, and blocked the following pre-emptively:
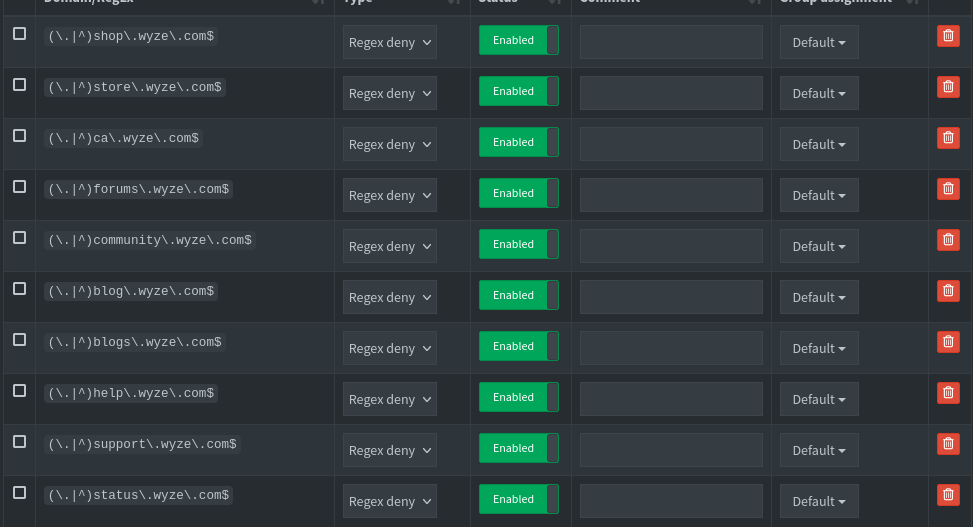
So far, the piholes have not caught the v4s phoning home to any of these domains, but better safe than sorry. I also left four different tabs open in Terminator all night to confirm that nothing was sneaking out the wan interface that shouldn’t be. All clean. I will note that most of this tutorial was already setup in beta form, however, it was kludgy and incomplete. After some discussions in the [[https://element.gnulinux.club|GNU/Linux Club]] about DoH, I decided to brush up my openWRT logic. I also made another vlan/subnet just for the cameras/IoT devices so I could more easily spot their traffic. To be clear, they were previously on a highly restricted subnet/vlan, but/and it was multi-purpose and included all the trashy platforms my kids use as well (Discord, Insta, etc.) thus making it hard to distinguish Wyze-originated or IoT-originated packets with ease. I also never wrote this up. Lastly, I need to give credit to [[https://jasonschaefer.com|Jason Schaefer]] who first taught me how to drop unwanted traffic on openWRT, tighten up LANs, and verify desired results with tcpdump. Lastly, I dedicate this tutorial to Bender.
Happy Hacking!
— oemb1905 —